
 Lessons: 43Length: 6.5 hours
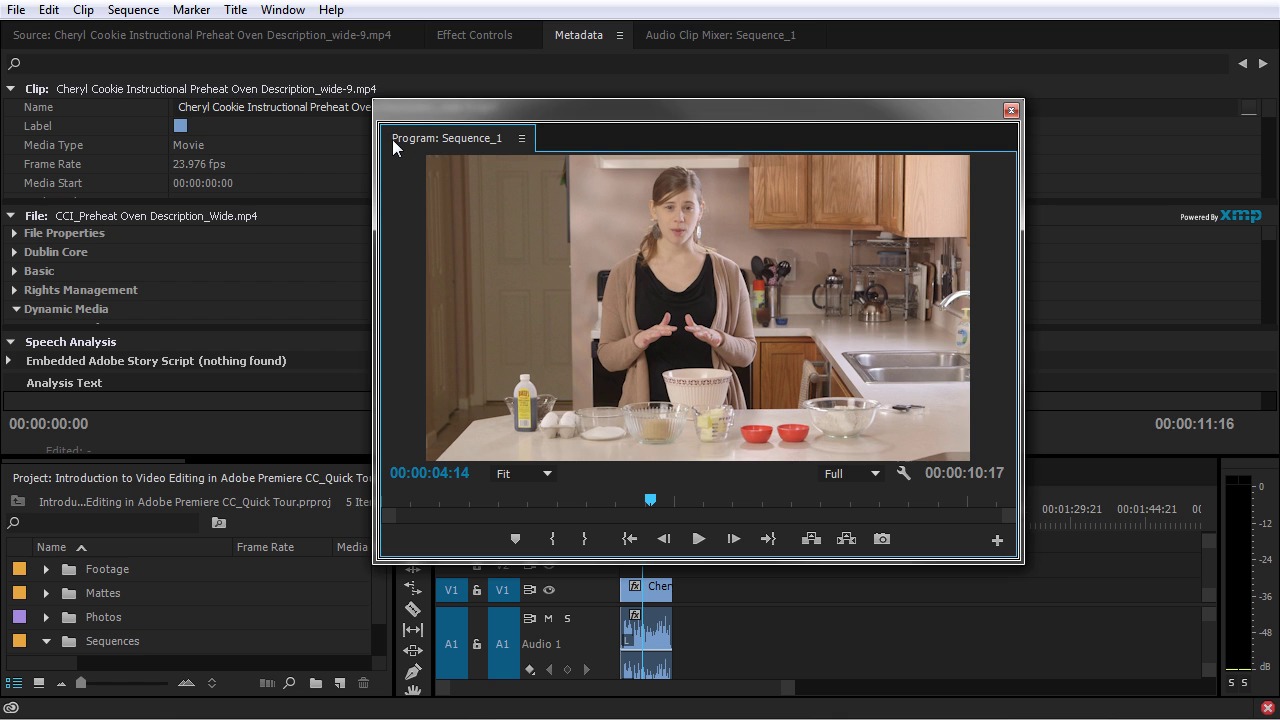
- Overview
- Transcript
2.2 Quick Tour of Premiere Pro
In this lesson you'll learn about the general layout of Premiere Pro. This will help you to follow along as you move through the rest of this course.
1.Introduction
1.1Introduction01:12
1.2What You Need07:14
2.Getting Started
2.1File Structure06:07
2.2Quick Tour of Premiere Pro11:14
3.Set Up Your Project
3.1Import09:55
3.2Organize08:39
4.Editing Basics
4.1Creating a Sequence10:07
4.2Cuts06:26
4.3Subclips06:46
4.4Editing in the Timeline, Part One11:27
4.5Editing in the Timeline, Part Two07:19
5.Beyond Basic Editing
5.1Adding a Cutaway Shot10:06
5.2Building on the Basic Edit, Part 107:09
5.3Building on the Basic Edit, Part 209:09
5.4Audio Transitions11:22
6.Fine-Tuning the Look and Sound
6.1Video Effects10:48
6.2Master Clip Effects10:47
6.3Adjusting the Volume of Your Tracks09:46
6.4Audio Effects11:17
6.5Adding Titles11:16
6.6Exporting12:10
7.Conclusion
7.1Conclusion02:33
8.Frequently Asked Questions
8.1FAQ Introduction01:22
9.Sharing
9.1Dynamic Link to After Effects12:44
9.2Exporting to HEVC for Faster Sharing Online06:39
9.3How to Export ProRes Video and Other Professional Formats07:17
10.New Audio Workflows
10.1Using the Essential Sound Panel for Dialogue: Part 111:58
10.2Using the Essential Sound Panel for Dialogue: Part 206:35
10.3Using the Essential Sound Panel for SFX and Ambience07:59
10.4Using the Essential Sound Panel for Music08:35
10.5Send Audio to Audition for Editing From Premiere Pro13:59
10.6Mixing Audio With Killer Effects Inside Premiere12:57
11.Essential Graphics Panel
11.1Use the Essential Graphics Panel to Create Basic Titles12:30
11.2Use the Essential Graphics Panel to Create a Motion Graphic Title in Premiere13:23
11.3Make Your Own Templates for the Essential Graphics Panel03:51
11.4How To Use Title Templates in the Essential Graphics Panel: Part 107:14
11.5How To Use Title Templates in the Essential Graphics Panel: Part 207:09
11.6How To Use Transition Templates in the Essential Graphics Panel08:26
12.Real-World Projects
12.1Use Proxies for Faster Editing13:42
12.2Create Multiple Camera Shots From a Single Camera10:56
13.New Features
13.1Using the Freeform View09:36
13.2Use Auto-Reframe to Crop Your Video09:36
13.3How to Work With Captions13:41
2.2 Quick Tour of Premiere Pro
I'm sure you wanna get editing right away, but it would be good to learn about the general layout of Premiere Pro. This will help you follow along as you move through this course. So, let's get started with the essentials. I just opened up Premiere Pro, and by default, it starts with a little welcome pop up here which shows you your recent items. It gives you an option to open project, you can create a new project, you can learn and get started, or you can just exit the program. You also have a little tick box here to show the welcome at startup and you can turn that off if you want. I wanna go over some of the interface elements with you. And to do that, you're gonna need to open up the same project that I'm using, and that's called Introduction to Video Editing in Adobe Premiere CC Quick Tour. I have it listed right here in my recent items because I've already had this project open, but for you, you're probably going to have to choose Open and then navigate to wherever you have it located. So when you open up your project in Premiere Pro, it should look something like this. And if it doesn't, come up here to Window, Workspace, choose Editing and then go to Window, Workspace, Reset Current Workspace. And what this will do is it'll reset the position of all the panels and all the windows so that it looks just like this. First let's go over the menu. You see we have File, Edit, Clip, Sequence Marker, Title, Window and Help. A lot of these menu items and features in the menu are redundant and can be performed by pressing a button in Premiere's interface, using a keyboard shortcut, or with a different context menu in one of the panels. But the menu is a good resource to use if you're trying to do something in Premiere, and you can't quite figure it out. You can kinda look through the menu and see if the action or the function you're looking for is in there. The window menu gives you access to all of the panels in Premiere's interface, and you'll find that you'll need to go in here from time to time to make some of these panels visible. Now, there's one thing specifically I wanted to draw your attention to in the menu and that's under Edit, Preferences, Auto Save. This preferences dialogue contains all of the main preferences in Premiere that you may want to set. You have general appearance audio, audio hardware, but really important, I think is the Auto Save. Auto Save, I think is a really important preference to check on and you can see that it's checked on right here. So that in case anything happens with your project, you won't lose your work. You can see I have it checked on right here, I have it set to automatically save every five minutes and maximum project versions is set to 10. There's also an option to save backup projects to a creative cloud if you are a creative cloud user. There may be a few more preferences that we check back with later in this course, but auto save is the only one that I'm really concerned with, right now. You can see the main interface here is broken up into panels. And panels are organized in the main application window in an arrangement called a workspace, which you saw in the beginning of this lesson where I came in and I made sure it was set to editing and then I reset the current workspace. There are a few preset workspaces, which is basically an arrangement of these windows doors assembly, audio, color correction. I created these two, dual monitor and edit with reference monitor. And once you arrange the windows how you like, if you want to save that, it's pretty easy to do. You just select new workspace, and then you name it and then it'll be available to you right up here anytime you want to use that particular workspace. I have one that's specifically set for using dual monitors. And what that does is it takes some of the windows and it pushes those out to a second monitor so I can maximize my workspace. Now, like I mentioned, the work space is customizable. So, these panels are all repositionable and the other panels will re-size to fit the work space. You can see, we can make any of these bigger or smaller just by grabbing and dragging in between the panels. You can also take the panels and move them around. So, if I click up here and drag, and I pull this over here you can see I'm getting these little purple indicators here. And that's letting me know that I can dock this window, in all of these locations. So if I put the Window over here, now, this big frame up here contains a bunch of tabs, and the program monitor which is the panel that I just moved is now sharing this tape with metadata, audio clip mixer, affect controls in the source monitor. I can also dock it to the sign. You can see those little trapezoids here. What that will do is kind of split the frame into two. So now I have a frame over here, where I can pull things in, I can create tabs over here. Or I can dock this wherever I would like. You can also take and just drag outside the application window just like I just did there, just went off the screen a little bit, but that will make a new window for you as well. So if you are using dual monitors or even triple monitors or quadruple monitors, you can drag these panels and then you can pull in other panels and create your own workspace to fill up all your monitor space. I'll just reset this here. And again, if I really screwed this up, and I really messed up the look of this and I want to get back to that default, super easy. I just reset the current workspace and it goes right back to this default. Now like I mentioned before, there are context menus in each one of these panels. Each panel will have a little menu here for closing the panel, closing the panel group, and so on. But if you right click in the panel, it'll bring up a menu with all kinds of different features. Additionally, there's also a little wrench icon here, which also has menu items as well. Now as you see, as I click around the interface, the panel that I'm currently selecting is highlighted blue and this is important because some of the menu items up here are not available if you have the wrong panel selected. You see I don't have anything available in the clip menu here because I don't have a clip selected. I'm currently selected on this tools panel here. And so I don't have any of these menu items. So it is important that you select the right window and also you have the right item selected. So even if I'm in the timeline panel here, if I don't have a clip selected, I still don't have any options here in the clip menu. I do have options here when I'm in the Sequence window, but. If I'm over here in the Info window, I can't access my sequence settings because I don't have a sequence selected. As soon as I select something like the program monitor, now the program monitor is displaying the current sequence that I'm working on and now I can go in and find my sequence settings. So let's go over some of the panels that you're going to be using the most. The program monitor is a panel that plays back the sequence of clips that you are assembling. So basically, the program monitor is the display of your timeline panel or the sequence that you are currently working on. Down here, this is the timeline panel, and this is where you work on your sequences. This panel right here is called the source monitor, and this plays back individual clips. And you can use the source monitor to prepare your clips before you add them to your sequence in the timeline window here. Down here, let me make a little bit of space. This is the project panel, you can see it says right here project, and then it gives you the name of this project. The project panel contains all of the assets you're going to use for your project. And it's where you can organize those assets so that they are easy to find. Way over here is the audio level meter panel and this duplicates the display of the audio track mixers master meters. That was a lot of words right there. So basically this is an audio meter and if I play this clip here. >> Because we are making larger cookies, you'll want to take the low and slow approach. This is not showing me the meter of this track, it's showing me the master meter. Now another panel that you're going to use quite often is right up here and that's the effects controls panel. Right now you don't see anything in here until I select a clip. And I can see I have some parameters here that I can adjust. Now I haven't added any effects on this clip, but there are a few default parameters here. If I add an effect to this from the effects panel, you will see the effects listed here and you can change the parameters of those effects. And if I did want to add an effect to this, what I would do is come down to this frame right here. And you see I have this little scroll bar right at the top there because this frame isn't big enough to display all of these panels or all of these tabs. And if I click right here, you will see the effects panel. Now the effects panel contains all of the audio and the video effects contained in Premiere. It's where you'll find all of the basic native effects that shipped with Premiere Pro and there are quite a few. It's also where you'll find any third party effects, which you may buy for Premiere Pro. Now, let me go over some of the other panels here that are brought up by default. You have your media browser panel here and this is a way that you can navigate your computer file system and pull in and import your clips and other assets into Premiere. This is going to become important in an upcoming lesson when we look at specific file types for certain camera systems. You have your info panel here and if I click on this clip, you can see some info listed about this clip. There's a markers panel here, so if I drop a marker in here, I can add some notes about this marker right here. And then there's the History panel, and this shows you what you've done so far in your project. If I jump up to this frame up here, you have an audio clip mixer. And this is a way that you can change the audio levels for individual clips. And then there is the metadata panel up here, which you can see all the metadata listed for this clip. There's certainly a lot more to know about these interfaces and menus, but this is the basic information that you need to know in order to move on with this course. In the next chapter of the course, you're going to learn about setting up a project. And that's gonna start with importing assets. So check that out coming up next.


