
 Lessons: 43Length: 6.5 hours
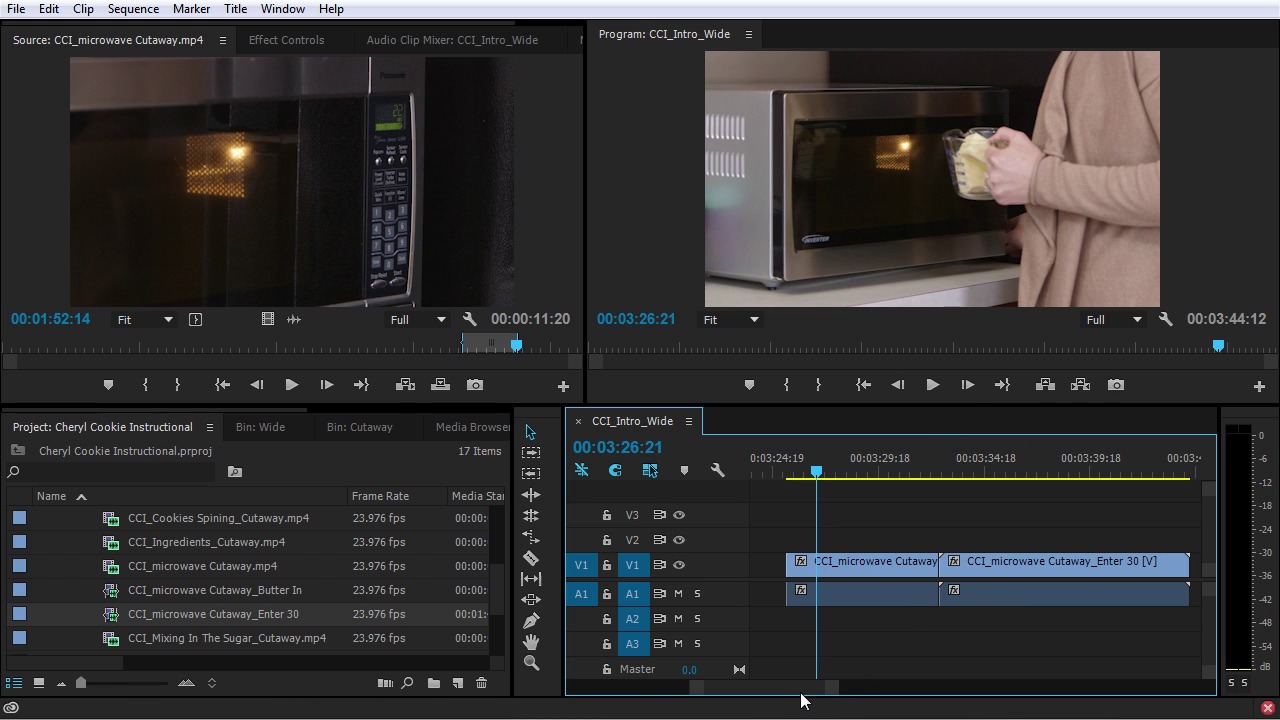
- Overview
- Transcript
4.3 Subclips
Sometimes you will need to pull several shorter clips from a single longer clip. The best way to do this is with subclips.
1.Introduction
1.1Introduction01:12
1.2What You Need07:14
2.Getting Started
2.1File Structure06:07
2.2Quick Tour of Premiere Pro11:14
3.Set Up Your Project
3.1Import09:55
3.2Organize08:39
4.Editing Basics
4.1Creating a Sequence10:07
4.2Cuts06:26
4.3Subclips06:46
4.4Editing in the Timeline, Part One11:27
4.5Editing in the Timeline, Part Two07:19
5.Beyond Basic Editing
5.1Adding a Cutaway Shot10:06
5.2Building on the Basic Edit, Part 107:09
5.3Building on the Basic Edit, Part 209:09
5.4Audio Transitions11:22
6.Fine-Tuning the Look and Sound
6.1Video Effects10:48
6.2Master Clip Effects10:47
6.3Adjusting the Volume of Your Tracks09:46
6.4Audio Effects11:17
6.5Adding Titles11:16
6.6Exporting12:10
7.Conclusion
7.1Conclusion02:33
8.Frequently Asked Questions
8.1FAQ Introduction01:22
9.Sharing
9.1Dynamic Link to After Effects12:44
9.2Exporting to HEVC for Faster Sharing Online06:39
9.3How to Export ProRes Video and Other Professional Formats07:17
10.New Audio Workflows
10.1Using the Essential Sound Panel for Dialogue: Part 111:58
10.2Using the Essential Sound Panel for Dialogue: Part 206:35
10.3Using the Essential Sound Panel for SFX and Ambience07:59
10.4Using the Essential Sound Panel for Music08:35
10.5Send Audio to Audition for Editing From Premiere Pro13:59
10.6Mixing Audio With Killer Effects Inside Premiere12:57
11.Essential Graphics Panel
11.1Use the Essential Graphics Panel to Create Basic Titles12:30
11.2Use the Essential Graphics Panel to Create a Motion Graphic Title in Premiere13:23
11.3Make Your Own Templates for the Essential Graphics Panel03:51
11.4How To Use Title Templates in the Essential Graphics Panel: Part 107:14
11.5How To Use Title Templates in the Essential Graphics Panel: Part 207:09
11.6How To Use Transition Templates in the Essential Graphics Panel08:26
12.Real-World Projects
12.1Use Proxies for Faster Editing13:42
12.2Create Multiple Camera Shots From a Single Camera10:56
13.New Features
13.1Using the Freeform View09:36
13.2Use Auto-Reframe to Crop Your Video09:36
13.3How to Work With Captions13:41
4.3 Subclips
Sometimes, you will need to make several shorter clips from one longer clip. The best way to do this, is by making sub clips, and in this lesson, you will learn how it's done. Sometimes you run into a situation where you will have a really long clip, and there will be several elements that you wanna pull out from that clip, in using your sequence. Let's jump into this Cutaway bin here. And double click on the microwave Cutaway clip. So this is a pretty long clip here, and it shows several things if we scrub through. You can see there's some opening and shutting of the microwave. And there's two elements that I want out of here. There's the putting, the butter into the microwave. Which happens right here. And then, there's a closeup shot of Cheryl dialling in 30 seconds on the microwave. So if I wanted to use this two separate times as two separate clips, I could mark an in and out point here. Add that to my sequence and then go back and add another in an out point and then add that to my sequence, or I could make a few sub clips. So to do that, I'm going to find the first part of this clip that I want to make into a sub clip, which is right here. So I'm going to get, Cheryl opening the door right here. So let me back this up a little bit. I'm gonna set an in point here, and then I'm gonna play this. Okay, right here. I'm gonna make an out point here, and then what I'm gonna do, is hold Ctrl and then pull this down into my project. And that's going to bring up this Make Subclip window here. And now, I can rename this. I can leave the main part of the clip named the same and then I can say, Butter In or something. And then I have an option to Restrict Trims To Subclip Boundaries. I'm gonna uncheck this, and then click OK. Then you can see it's listed down here as a different icon, and then I will do the same thing. I will scrub along here and find the inpoint, which is right about here, set an inpoint. And then I will select an out point, somewhere in this neighborhood. I can also make a subclip from this by coming up here to the Menu, and choosing Make Subclip, or I can use the keyboard shortcut Ctrl-U. So with this selected, I will hit Ctrl-U, it's gonna bring this up. I will rename this Enter 30, and this time I will check the box Restrict Trims to Subclip Boundaries. Now when I pull these into my project, You can see that they're much shorter, and in the Project panel here I have them labeled in a very convenient way so that I can find them later if I need to. I'm gonna move the playhead over these two clips, and then I'm gonna zoom up on them by holding down ALT and scrolling with the mouse wheel. Now there were two options that I selected when I made those sub clips. The second one I chose to Restrict Trims To Subclip Boundaries. And what that does is, it makes it so this clip, I am no longer able to extend the length of this little sub clip here. You can see, I have those little white triangles at the beginning and the end of this clip meaning that, I can't make this longer than what I have right here. Even though this clip is actually longer. You can see that right up here. This is that clip that I just made. And, this original clip is much longer than this, but because I chose Restrict Trims To Subclip Boundaries, when I pull that into my sequence, I can no longer make this any longer. I don't really like that. So, I wanna take this and delete it. You can see on this other sub clip here, this just shows up like any other clip that I marked in, in and out point four. So I can take this, and I can pull out the ends of this to make this longer if I want to, and I'm not restricted by that option. So, I could take this guy right here in the Project panel and delete it. Come up here to the source monitor, hit Ctrl-U again. This time I'm going to, uncheck Restrict Trims to Subclip Boundaries. Name that, Enter 30. Pull that back into the Cutaways folder, somehow that got moved up. And now when I add this to the project, you can see that I don't have those restrictions on the beginning and the end of this subclip. Now let me go back, and I'll undo this just for a second. Now if you do for whatever reason, like that option to restrict the trims to the subclip boundaries, you can edit it afterwards. You can come over here to the Project panel, right-click, and then just off the screen here, there's an option to Edit Subclip. And now what I can do, is I can change the in and the out point here of this sub clip. Now I can't go longer than the original clips duration, but I can change the in and out point. So, I could scrub this back a little bit, and it will show you that now the start has shifted negative two seconds and seven frames. I get to make the in point a little bit longer. And I can also take off this restriction that restricts the trims to sub clip boundaries. And you can see what it's done there is made this clip longer and it's also removed that restriction. So, you do have options either way but making sub clips is another valuable tool in speeding up your workflow. Because now, if I want to add this butter going into the microwave shot throughout this edit for whatever reason, and I'm not saying that you should or you need to in this particular edit, but you definitely will find uses for making sub clips. Now it's searchable in my project panel. And now I have it ready to go and already clipped out, so I don't have to keep coming back to this microwave cutaway clip in trimming out little parts that I want to use. And you can imagine if I had a much, much longer clip, say several minutes or even an hour, it would be much more convenient to make several sub clips from that, instead of scrubbing through the entire thing every time I wanted to find a little element, or a little bit of action that I wanted to use for my sequence. In the next lesson, you're gonna learn how to get in here and start editing in the timeline. So check that out coming up next.


