
 Lessons: 43Length: 6.5 hours
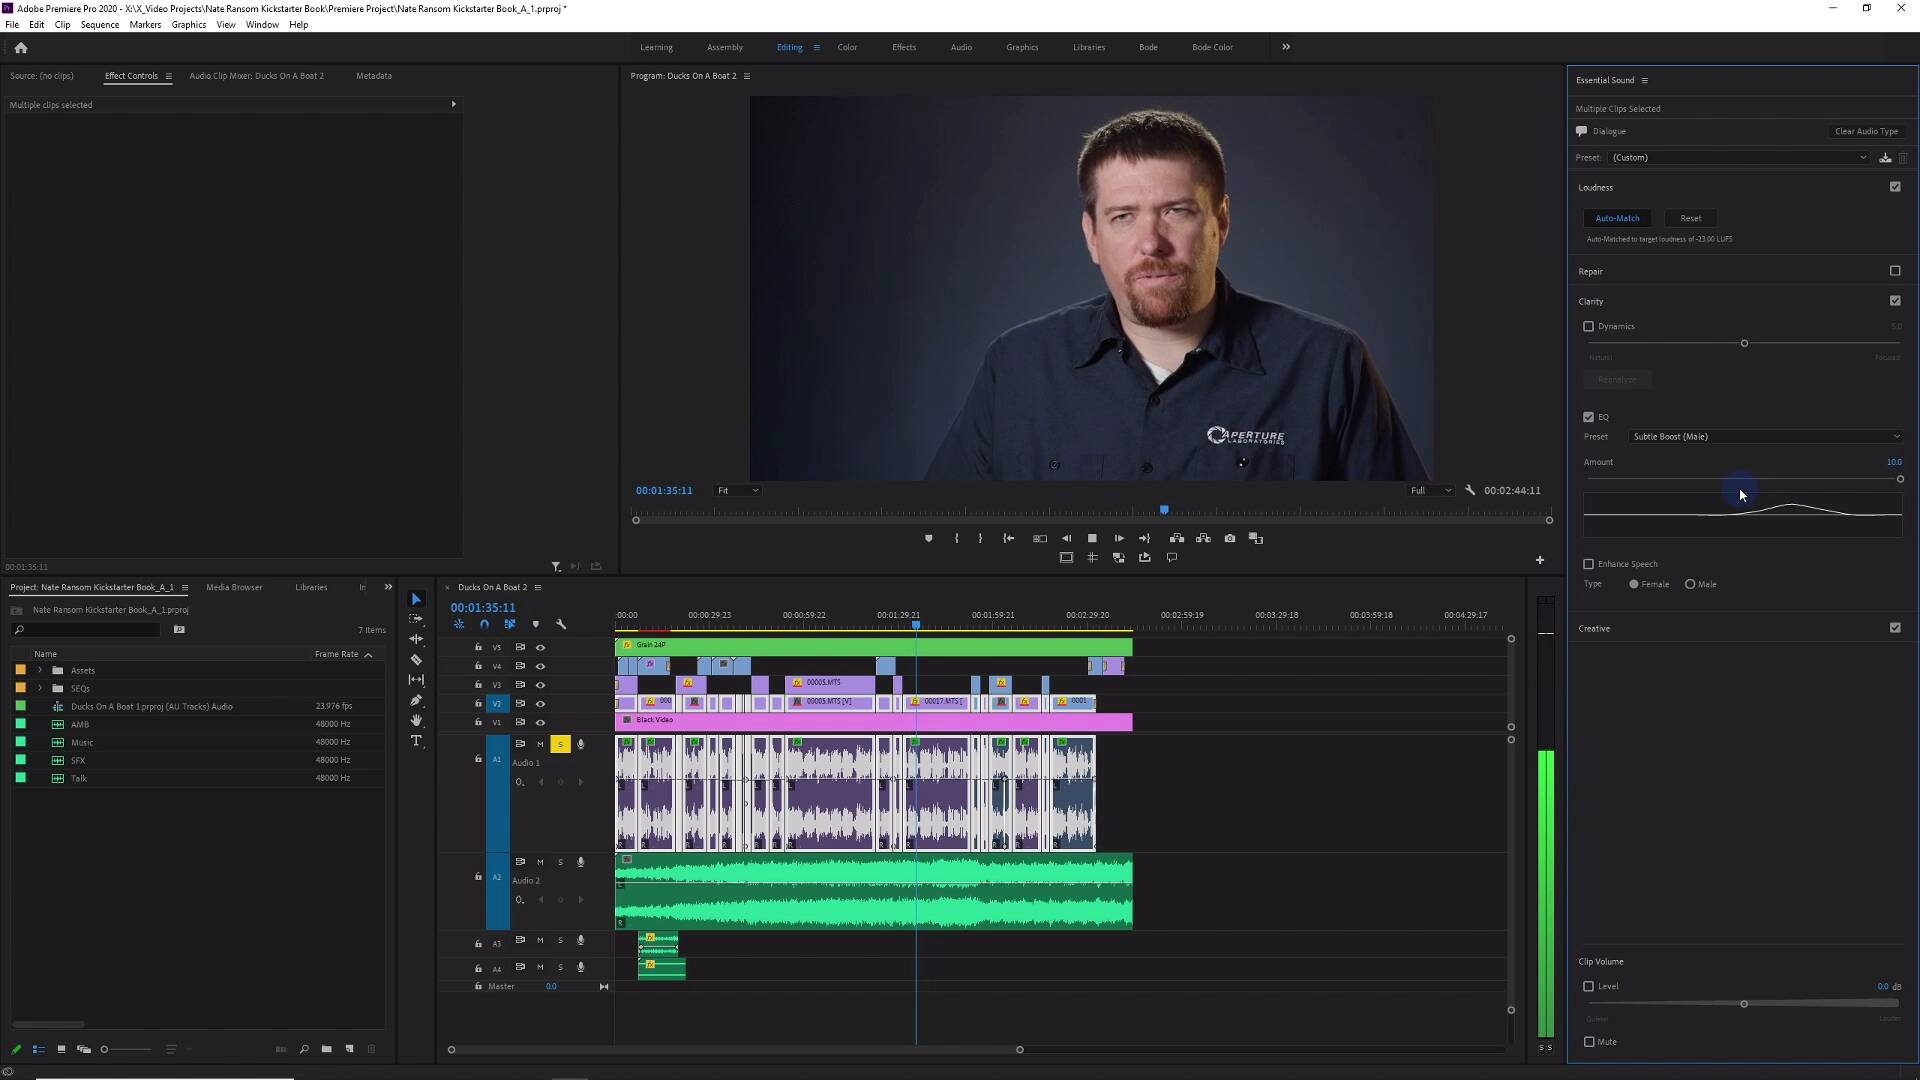
- Overview
- Transcript
10.2 Using the Essential Sound Panel for Dialogue: Part 2
In this lesson, you will continue learning how to use the Essential Sound Panel to clean up and treat your dialogue.
1.Introduction
1.1Introduction01:12
1.2What You Need07:14
2.Getting Started
2.1File Structure06:07
2.2Quick Tour of Premiere Pro11:14
3.Set Up Your Project
3.1Import09:55
3.2Organize08:39
4.Editing Basics
4.1Creating a Sequence10:07
4.2Cuts06:26
4.3Subclips06:46
4.4Editing in the Timeline, Part One11:27
4.5Editing in the Timeline, Part Two07:19
5.Beyond Basic Editing
5.1Adding a Cutaway Shot10:06
5.2Building on the Basic Edit, Part 107:09
5.3Building on the Basic Edit, Part 209:09
5.4Audio Transitions11:22
6.Fine-Tuning the Look and Sound
6.1Video Effects10:48
6.2Master Clip Effects10:47
6.3Adjusting the Volume of Your Tracks09:46
6.4Audio Effects11:17
6.5Adding Titles11:16
6.6Exporting12:10
7.Conclusion
7.1Conclusion02:33
8.Frequently Asked Questions
8.1FAQ Introduction01:22
9.Sharing
9.1Dynamic Link to After Effects12:44
9.2Exporting to HEVC for Faster Sharing Online06:39
9.3How to Export ProRes Video and Other Professional Formats07:17
10.New Audio Workflows
10.1Using the Essential Sound Panel for Dialogue: Part 111:58
10.2Using the Essential Sound Panel for Dialogue: Part 206:35
10.3Using the Essential Sound Panel for SFX and Ambience07:59
10.4Using the Essential Sound Panel for Music08:35
10.5Send Audio to Audition for Editing From Premiere Pro13:59
10.6Mixing Audio With Killer Effects Inside Premiere12:57
11.Essential Graphics Panel
11.1Use the Essential Graphics Panel to Create Basic Titles12:30
11.2Use the Essential Graphics Panel to Create a Motion Graphic Title in Premiere13:23
11.3Make Your Own Templates for the Essential Graphics Panel03:51
11.4How To Use Title Templates in the Essential Graphics Panel: Part 107:14
11.5How To Use Title Templates in the Essential Graphics Panel: Part 207:09
11.6How To Use Transition Templates in the Essential Graphics Panel08:26
12.Real-World Projects
12.1Use Proxies for Faster Editing13:42
12.2Create Multiple Camera Shots From a Single Camera10:56
13.New Features
13.1Using the Freeform View09:36
13.2Use Auto-Reframe to Crop Your Video09:36
13.3How to Work With Captions13:41
10.2 Using the Essential Sound Panel for Dialogue: Part 2
In this lesson, we're gonna pick up right where we left off in the last lesson, talking about the essential sound panel and learning how you can use it to help clean up and punch up your dialogue for great sounding mixes. The next section down is clarity. And there's some good things in here, and there's some things that I don't think are super useful. The one thing that I like is this dynamics feature. I think this is pretty good. And it has an analyze button here. And it'll kind of analyze your clips. And basically, what this is going to do is help you to get a more consistent level in all of your clips. And what this applies is a dynamics effect, which is essentially a compressor and an expander. And you don't really have to know exactly what that's doing, but the effect is that it turns up the louder stuff, and it turns down the quieter stuff. And the quieter stuff is all of the stuff in the background so background noise, maybe some weird mouth noises in a recorded dialogue track. It could be traffic noise in the background. All of the lower level audio stuff gets pushed down and all of the upper level audio stuff in terms of the amplitude, which is usually where the talking sits, hopefully, in your dialogue tracks, the part that you want to hear is well above the background stuff. And if that's the case, then this will just make that more so it pushes the dialogue up above the rest of the audio. And so just applying this dynamics effect to these clips, check this out. >> So one of the things I've realized in my life is that, I actually really enjoy teaching. I have a few young kids, and I've been really excited by seeing them grow and how they learn. >> It makes it a lot more consistent because things that are really loud get compressed a little bit, but overall, this is just a nice smoothing effect. And again, any values around right here in this kind of middle range are going to work. The next section down is EQ, and I'm kind of 50-50 splits on this EQ setting here in the essential sound panel. I like the first kind of six presets that it has for background voice, intercom, locked in the trunk, old radio, on the telephone, outside the room. Yeah, that's six. I think all of these the EQ preset is actually pretty good. If I wanted to, for example, make this clip right here sound like it was on the telephone. Check this out. >> I like to see is taking this general idea of ducks that are learning lesson. >> I think that's pretty good actually. However, the other options that it has here for podcast voice, subtle boost, that public radio sound, and vocal presence, I don't really like these as much because I think the curves are not in the right area, at least for me. And the microphones that I use and what I like to hear, I don't think they do a great job of doing a subtle male boost. It does boost something, but I don't think it does in a way that makes it sound nice. Take a listen. >> And kind of expanding it over a number of different ideas. And these books, you're gonna actually get to help us pick where we should focus. One of the areas I am particularly passionate about is different types of technology and the ways that these ducks could learn lessons about how it works and why. Some of the other areas we've discovered- >> Now all of those are not bad. They're just not that great. And there's better ways to EQ using the track mixer and a nicer parametric EQ effect. But you may find that one of these presets works great for you, again, your mileage may vary. Finally, we have the enhanced speech option down here. >> Ways that these ducks could learn lessons about how it works and why. Some of the other areas we've discussed are actually things around freedoms, or the way you would treat others and things like that. So now that you've heard about our project, how can you help? >> It does enhance the voice, I'll give them that. I don't think it sounds quite as nice. But again, you're listening to something that was recorded in my studio with a really pretty nice microphone and some decent preamps. It does have a tiny bit of noise on there. But you may be dealing with audio that was recorded maybe with a lavalier mic under a shirt. And that is usually going to sound kind of muffly. And so you may need a little of this enhanced speech effect to be able to give that a little bit of punch to be able to sit right in the mix. Again, all of these effects are not things that you will reach for all of the time, but it's good to know about them. And finally, we have the creative option down here at the bottom. And basically, all this does is add some reverb to your dialogue. >> Ways that these ducks could learn lessons about how it works and why. >> Now, for the most part, all the presets here are very nice sounding. Its usefulness in every situation I think is pretty limited. This is much more of an effect. Maybe you're doing some kind of narrative piece and you need to match some close miced dialogue with another mic that has a lot more room sound. Well, there's a preset for that. In a large reflective room or maybe small dry room and that may help you to very quickly kind of match what's going on. For talking head stuff this, interviews, reverb is not what you want to add because it's only going to mask the messaging, basically. If you have to do some kind of pickup voiceover where you've recorded an interview like this in a quite reverberant space and you needed to match that, that's when you may want to reach for this option here and put a tiny bit of reverb on that voiceover pickup. Maybe that pickup is over some B roll so you can get away with it. Again, just like everything else, your mileage may vary. But that about wraps it up for this dialogue section. Because audio is so important, I wanted to give this lesson a little bit of space to be able to expand and explore and just give you a nice demo of what these tools can do to help clean up your audio. Well, that about does it for this lesson. Make sure to check out the next lesson where you are going to learn how to use the essential sound panel to balance the music against dialogue, sound effects, ambience, and more. [MUSIC]


