
 Lessons: 43Length: 6.5 hours
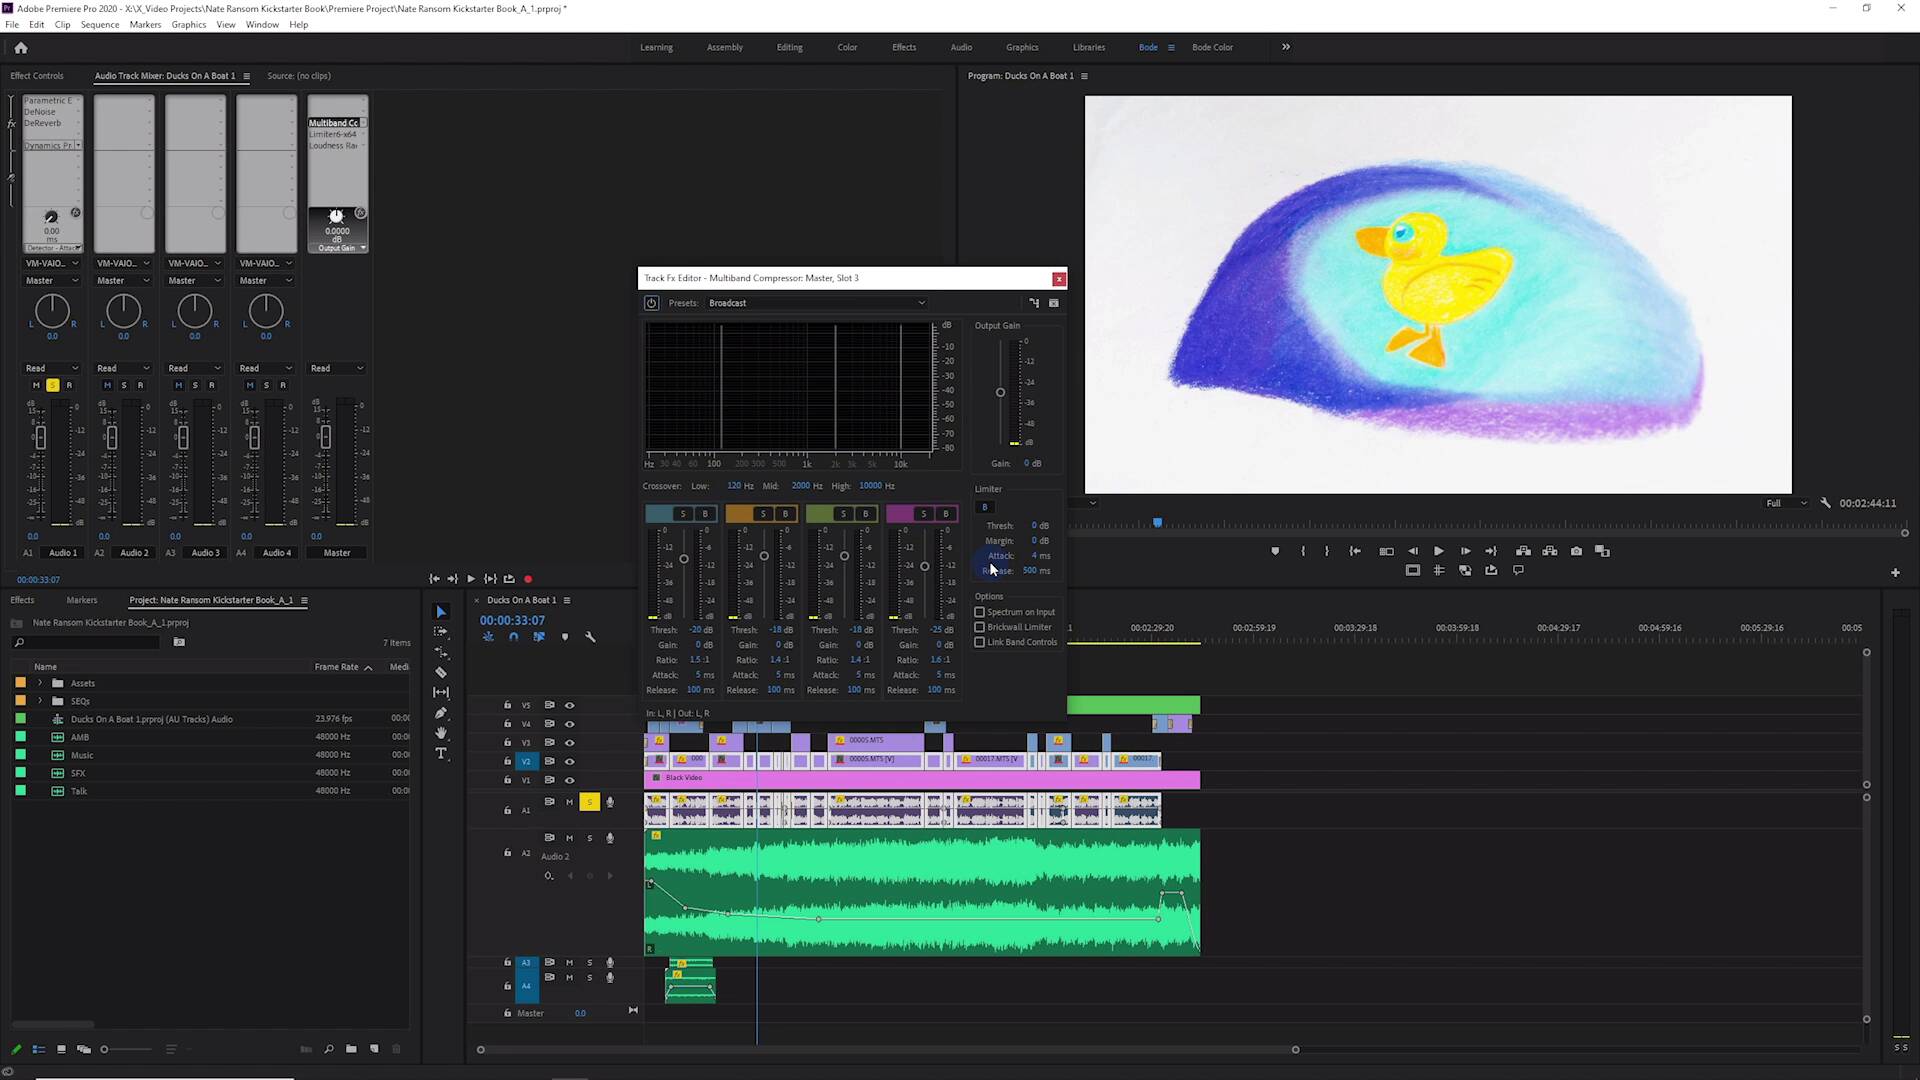
- Overview
- Transcript
10.6 Mixing Audio With Killer Effects Inside Premiere
In this lesson, you will learn how to mix and treat your audio in Premiere with the Audio Track Mixer and killer new audio effects!
Related Links
- Royalty-Free Music on Envato Elements
- Royalty-Free Sound Effects on Envato Elements
1.Introduction
1.1Introduction01:12
1.2What You Need07:14
2.Getting Started
2.1File Structure06:07
2.2Quick Tour of Premiere Pro11:14
3.Set Up Your Project
3.1Import09:55
3.2Organize08:39
4.Editing Basics
4.1Creating a Sequence10:07
4.2Cuts06:26
4.3Subclips06:46
4.4Editing in the Timeline, Part One11:27
4.5Editing in the Timeline, Part Two07:19
5.Beyond Basic Editing
5.1Adding a Cutaway Shot10:06
5.2Building on the Basic Edit, Part 107:09
5.3Building on the Basic Edit, Part 209:09
5.4Audio Transitions11:22
6.Fine-Tuning the Look and Sound
6.1Video Effects10:48
6.2Master Clip Effects10:47
6.3Adjusting the Volume of Your Tracks09:46
6.4Audio Effects11:17
6.5Adding Titles11:16
6.6Exporting12:10
7.Conclusion
7.1Conclusion02:33
8.Frequently Asked Questions
8.1FAQ Introduction01:22
9.Sharing
9.1Dynamic Link to After Effects12:44
9.2Exporting to HEVC for Faster Sharing Online06:39
9.3How to Export ProRes Video and Other Professional Formats07:17
10.New Audio Workflows
10.1Using the Essential Sound Panel for Dialogue: Part 111:58
10.2Using the Essential Sound Panel for Dialogue: Part 206:35
10.3Using the Essential Sound Panel for SFX and Ambience07:59
10.4Using the Essential Sound Panel for Music08:35
10.5Send Audio to Audition for Editing From Premiere Pro13:59
10.6Mixing Audio With Killer Effects Inside Premiere12:57
11.Essential Graphics Panel
11.1Use the Essential Graphics Panel to Create Basic Titles12:30
11.2Use the Essential Graphics Panel to Create a Motion Graphic Title in Premiere13:23
11.3Make Your Own Templates for the Essential Graphics Panel03:51
11.4How To Use Title Templates in the Essential Graphics Panel: Part 107:14
11.5How To Use Title Templates in the Essential Graphics Panel: Part 207:09
11.6How To Use Transition Templates in the Essential Graphics Panel08:26
12.Real-World Projects
12.1Use Proxies for Faster Editing13:42
12.2Create Multiple Camera Shots From a Single Camera10:56
13.New Features
13.1Using the Freeform View09:36
13.2Use Auto-Reframe to Crop Your Video09:36
13.3How to Work With Captions13:41
10.6 Mixing Audio With Killer Effects Inside Premiere
[MUSIC] In this lesson, you're gonna learn about some of the newer audio effects available in Premiere Pro to make your projects sound great. [MUSIC] So if you haven't used the Audio Track Mixer before, that's what I'm going to be showing in this lesson. And to get it, you can come up to the menu here and just go down to Audio Track Mixer, and open that up. The Audio Track Mixer is not what you see in kind of this standard editing layout if I reset this to the saved layout. By default, it shows you the audio clip mixer. I don't find that very useful. I can very quickly in any one of these clips here, just Ctrl + click on the track volume or the track gain here. And that will give me a little key frame. And I can move it up and down and I can basically mix it like this. It's a quick way to do it. I've been doing it for years and I think it works pretty well. And so for most of the dialogue stuff, what I do is I will get it all lined up and do my edit, and when it comes time to really find the audio, I'll select all of my audio for the dialog. And then I'll bring up the Essential Sound panel, I'll mark it all as dialog, and you'll see it is already marked as dialogue. And then I'll automatch the loudness and then I'll close the Essential Sound panel because that's basically all I use it for. For all of the rest of the audio treatment, I do that in the track mixer. I created a workspace here that has only the things that I like and I use and gets rid of the stuff that I don't use very frequently. But if you wanna bring up that Audio Track Mixer, you just come up here to Window > Audio Track Mixer. So in the Audio Track Mixer, I usually will keep all of my talk tracks in the first two or three or four slots or all the dialog tracks, if you will. And then I load those tracks up here in the Audio Track Mixer with some effects. These are not audio plugins that were released in the last edition. They're actually a few years old. But since my original Intro to Video Editing in Premiere Pro, these are some new and updated effects. So let's start with the EQ. This is something that I use a tonne on dialogue, sometimes on music, although usually music is pretty well produced and it doesn't need corrective EQ, although sometimes you will need to throw an EQ on to carve out some frequencies for speech intelligibility. But we're just gonna be taking a look at basic kind of dialogue stuff in this lesson. This is a really nice updated EQ. I really liked that we have a high pass filter with a variable slope. So what this means is we set the high pass frequency and it's only going to pass frequencies above this point. And below this point, it's going to reduce the amplitude or intensity, if you will, of those frequencies by differing amounts. So if we set this to 6 decibels per octave, you can see that's a very smooth roll off. And so you can very carefully roll off in various amounts, the low energy off dialogue tracks, and this is something that I always do with dialogue tracks, because none of this information below 50, 60, 70 hertz is really useful. But it can sneak into mixes and cause some weird rumbling and obscure other tracks with low energy, so I just get rid of it. And then I just use the rest of these nodes, and there are quite a few of them. There is a low shelf and a high shelf, and then there are five fully parametric bands of equalization. Now just like you saw in some of the previous lessons, the DeNoise effect, which is very good is available in this Audio Track Mixer along with a DeReverb effect, which is also very good. I normally don't use DeNoise and DeReverb on every single track. Usually I will apply some DeNoise on a dialogue track because there's usually just a little bit of noise depending on how much it bothers you or how audible it is. The stock DeNoise effect is excellent, even if you jack up the amount all the way to 100%, it's still pretty great sounding, although I don't recommend that unless you have seriously noisy audio. But these are both excellent effects, and I use them all of the time. Another effect that I think is fantastic is this dynamics processing effect right here. And by the way, you can load these effects by just clicking into any of these empty slots here, and then they're all categorized. So amplitude and compression are dynamic type effects. These are things that affect the amplitude of your signal. But you can find the rest of the audio effects all categorized here as well. This dynamics processing effect is really nice. This is basically a compressor and an expander all in one. And the thing that I like about it is that It has a really nice visual to it where you can see the audio coming in and see exactly how you might want to set this up based on the audio coming into this input/output graph here. So this is really nice. It's got a spline curve which without this is a little bit harsher sounding, I think. So I usually will enable the spline curve which gives a softer curve to this compression slope here. It also has a nice Settings section where you can adjust the look-ahead time, the level detection, the gain processing and the band limiting here as well. So, really great effect. On the Master Buss, I'll show you the three effects that I use all of the time, one of those is the multiband compressor, this is a newer effect. Premier has had a multiband compressor for a little while. They used to licence one, I believe, from Isotope and now they have their own which looks very, very similar. This is a kind of multistage dynamics processor. So a multiband compressor splits the signal into at least four bands, although you can disable these and have it work on less than four bands, and then you can compress them individually. I use this on the Master Buss to basically smooth out all of the frequencies, and it's set very, very conservatively with a ratio of 1.5 to 1, so that's not very much compression at all. This effect also has a limiting section right here. It's got a limiter and then there's a brick wall limiter down here which you can enable. I haven't found these to be incredibly effective. So I usually do not enable the limiter section here and I don't check on this brick wall limiter. And the reason is because I use this third-party limiter here. This is called Limiter No6, which by the way is free and it's awesome. I use this in my Master Buss to do a few things. It does a very gentle amount of compression, although you can set this up however you want. I use it for a very gentle compression. It has a multiband peak limiter, although you can set it to singleband or mid side, it's got a ton of options, but I use it as a multiband peak limiter. And I don't use the high frequency limiter or the clipper, but I do use this last section. This has a final, what's labeled as a protection limiting stage at the very end. And one of the modes, you can set it to digital clip, inter-sample peak fast, and inter-sample peak precise. This measures the peaks in between the audio samples of a digital audio system. So the peaks that you see here in the Master Buss, these are sort of lying to you, because these do not read inter-sample peaks. And sometimes, inter-sample peaks can actually be 3 decibels higher than what your standard sample peak kilometer is showing you. That can be problematic because to meet certain audio standards, you need to have inter-sample peak basically capped at a certain level. Sometimes its negative 1.5, sometimes it's negative 2. Negative 2 will pretty much cover you for, I think, most all standards out there. The limiter that is built into this multiband compressor, both this limiter right here and the brick wall limiter, I have been able to pass peaks above where I have set these thresholds, and that's no good. So I always use this Limiter No6 for some very gentle compression and peak limiting and to make sure that my absolute true peaks are not higher than negative 2 or sometimes negative 1.5. It's a fantastic effect. Now to use third-party effects in Premiere, you could come right over here to the Audio Track Mixer and there's a little three line, what I call a hamburger menu. And if you click that, you can come down here to Audio Plugin Manager. There's also an audio plugin manager for audition. And then when you download effects from the Internet, free effects or commercial effects, effects that you pay for, you put those all in a folder, they have to be 64 bit plugins, which is pretty standard these days. And then you can point this audio plugin manager to that folder by adding it here and you add the directory and it will scan those. And then you can enable or disable any of the effects that you want to show up in Premiere. You can see I have quite a few, but I only really use a handful of the VST effects that could work in Premiere. I don't use all of them. I only need a handful. Between the third-party effects and the fantastic stock effects that you get, especially this DeNoise and DeReverb, you can get a ton of audio work done right inside of Premiere. Now, like I mentioned before, there are some limitations. And the main limitation is that at this point in time, you can't save an effects chain in the Audio Track Mixer. Meaning, I can't save these four effects in the configuration that I have them. So you have to load them individually every time, which is fine because you don't necessarily need all of these for every dialogue track. The other limitation is once you get a setting that you like in one of these effects, maybe it's this multiband compressor, I have to set this up every time because there is no way currently to store an audio track preset. You can save presets when you apply them to clips as an audio effect if I were to drop that on a clip, but you can't do that to the Master Buss and you can't apply effect presets to any of these, they just have these stock presets, which I don't think are very good. So usually what I'll do is I'll just pick a preset that closely matches what I want to do and then just adjust a few of the parameters. Usually, that is, let's just set it back to default. The classical master is a good place to start. And then usually what I'll do is just change the attack times here to 5 instead of 10 because that's too slow. And then just disable the limiter, and that's pretty much it. So it really only takes a few seconds to do, but it is a feature that they should have and it is a user requested feature but it's not available yet. Now the one workaround to this is you can create a project with a blank sequence with no footage, load up the Audio Track Mixer. Create all of the kind of audio layouts that you want with your dialogue tracks here with all the effects configured exactly how you like them, and then just save that project. And then when you start a new project, you'll load that project as kind of a project template. You can also have all of your folders in there as well for organization, which is a time saver. So that is a workaround. It's not a great workaround, but if there was something that I would complain or caution you against using this method for, that would be it. However, I don't find that a huge limitation. It's really not a big deal. So that about does it for this lesson, make sure to check out the next lesson, where you're gonna learn about the Essential Graphics panel in Premiere. [MUSIC]


