
 Lessons: 43Length: 6.5 hours
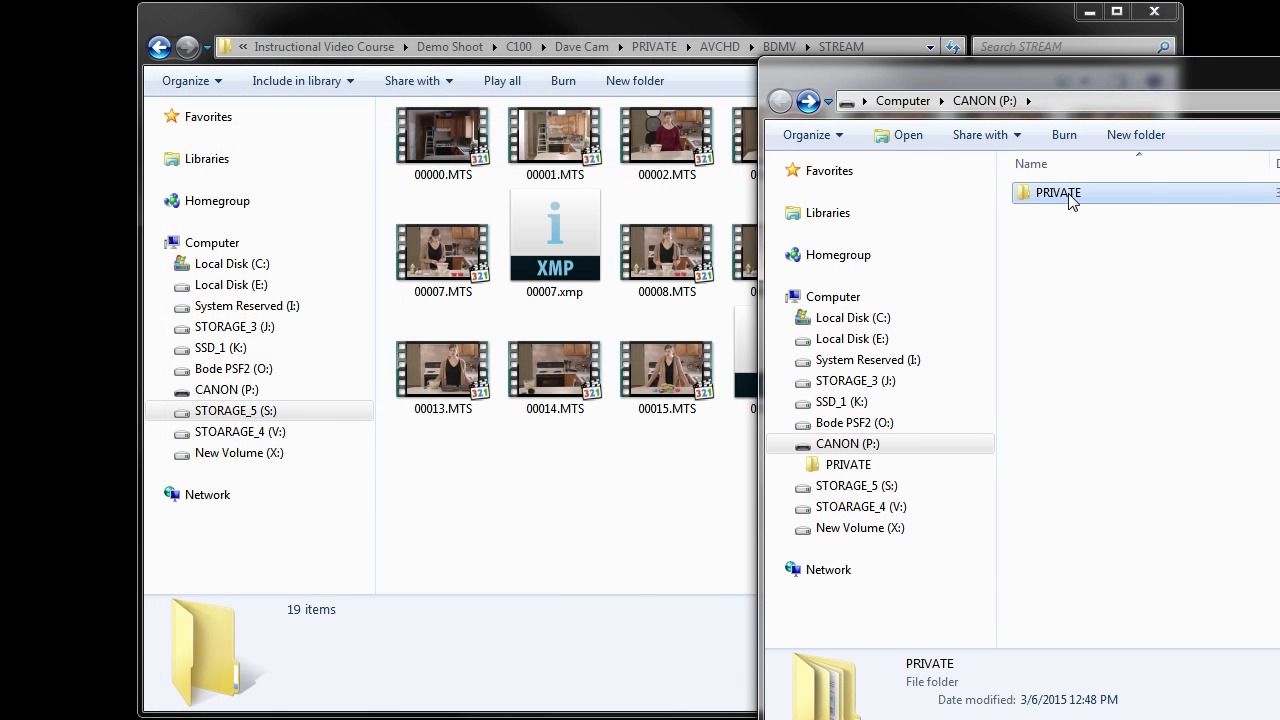
- Overview
- Transcript
2.1 File Structure
Before you start pulling your video footage into Premiere, it's smart to do a bit of file organization first. This is a critical step with some cameras because if you get the folder structure wrong, your footage won’t work properly. In this lesson you will learn how to do some basic file organization.
1.Introduction
1.1Introduction01:12
1.2What You Need07:14
2.Getting Started
2.1File Structure06:07
2.2Quick Tour of Premiere Pro11:14
3.Set Up Your Project
3.1Import09:55
3.2Organize08:39
4.Editing Basics
4.1Creating a Sequence10:07
4.2Cuts06:26
4.3Subclips06:46
4.4Editing in the Timeline, Part One11:27
4.5Editing in the Timeline, Part Two07:19
5.Beyond Basic Editing
5.1Adding a Cutaway Shot10:06
5.2Building on the Basic Edit, Part 107:09
5.3Building on the Basic Edit, Part 209:09
5.4Audio Transitions11:22
6.Fine-Tuning the Look and Sound
6.1Video Effects10:48
6.2Master Clip Effects10:47
6.3Adjusting the Volume of Your Tracks09:46
6.4Audio Effects11:17
6.5Adding Titles11:16
6.6Exporting12:10
7.Conclusion
7.1Conclusion02:33
8.Frequently Asked Questions
8.1FAQ Introduction01:22
9.Sharing
9.1Dynamic Link to After Effects12:44
9.2Exporting to HEVC for Faster Sharing Online06:39
9.3How to Export ProRes Video and Other Professional Formats07:17
10.New Audio Workflows
10.1Using the Essential Sound Panel for Dialogue: Part 111:58
10.2Using the Essential Sound Panel for Dialogue: Part 206:35
10.3Using the Essential Sound Panel for SFX and Ambience07:59
10.4Using the Essential Sound Panel for Music08:35
10.5Send Audio to Audition for Editing From Premiere Pro13:59
10.6Mixing Audio With Killer Effects Inside Premiere12:57
11.Essential Graphics Panel
11.1Use the Essential Graphics Panel to Create Basic Titles12:30
11.2Use the Essential Graphics Panel to Create a Motion Graphic Title in Premiere13:23
11.3Make Your Own Templates for the Essential Graphics Panel03:51
11.4How To Use Title Templates in the Essential Graphics Panel: Part 107:14
11.5How To Use Title Templates in the Essential Graphics Panel: Part 207:09
11.6How To Use Transition Templates in the Essential Graphics Panel08:26
12.Real-World Projects
12.1Use Proxies for Faster Editing13:42
12.2Create Multiple Camera Shots From a Single Camera10:56
13.New Features
13.1Using the Freeform View09:36
13.2Use Auto-Reframe to Crop Your Video09:36
13.3How to Work With Captions13:41
2.1 File Structure
Before you starting pulling your footage into Premiere, it would be smart to have your files organized first. This is a critical step with some camera systems, because if you get the folder structure wrong, your footage won't work properly. In this lesson, you will learn how to do some basic file organization. You're looking at a folder that contains assets for an instructional course that I'm putting together on how to shoot and produce an instructional video. And I wanted to show you this to just give you a general idea of what you might wanna think about when you're organizing your files. I have a collection of different types of media in this folder here. You see I have some VoiceOvers, which are WAV files, and I recorded that in an application called Reaper. So there's a lot of Reaper backup files, and a Reaper project file in here. I did some screen recordings, and so I have those uncompressed AVI files in a folder. I had some test photos that I shot. I have some docs and a few title graphics here that I threw in folder just to keep it a little more organized. I have a folder with B-roll shots in here, which I went through and changed the file names so that I can find them more easily if I want to use any of these shots in another project. Then I have all the footage files from the cameras that were used to shoot this project. Now, the main portion of this project is in this Demo Shoot folder here. And if I go into here, you can see I have it broken down by the type of camera that was shot, so a Canon 7D, a Canon C100, and a GoPro 4. And so you'll see, I have my files in here. Most of these are video files, although I think I may have accidentally shot one photo with the lens cap on there. But I just throw everything right into the folder. Then I have a C100 folder, and there's two folders in here because I used two Canon C100s to shoot this project. And with some cameras, it's very important that you keep the folder structure exactly the same as how the camera originally created it. Because if you don't, importing those into your video editor can really screw things up. This Canon C100 is one of those cameras. So, if I drill down into one of these folders, you'll see that there's many subfolders in here, and it has this kind of strange folder structure. The video files are actually in this streams folder here. But if I were to take the video files out of this folder and put them in a folder called Dave Cam C100, they would not import into Adobe Premiere properly. Because there are some other files in here which will tell Premiere that some of these files are actually a continuous recording, even though they're stored as separate files. This is something we're gonna talk about more in an upcoming lesson, but I did wanna go over with you a little bit first. For example, I just stuck this card from my camera into my card reader, and when I open it up to view the files, you're gonna see that same weird folder structure here. And all of the video files are in this streams folder, but when I'm taking this footage off of the card, what I do is grab this private folder and I put that inside another folder, just like I did with this other folder here. You can see I've organized it C100, Dave Cam, and then I put that entire folder right inside here. I did the same thing with this other camera here, with Andrew Cam, you see it says PRIVATE, AVCHD, and then the video files are actually down here in the streams folder. It's critical for the files that are shot with this Canon C100. And I think a lot of the other cameras that shoot to AVCHD format, and possibly some other codecs, that you keep the file structure and the folder structure intact right from the memory card. I'll just jump back here and show you I have a GoPro folder here, and I just threw all of the video files right from the card in this folder. I have some audio files that were recorded from an iPhone, and all of that is part of this demo shoot here. So I have all of that organized accordingly. I have a few other folders here, Conclusion, and Main Teaching and Introduction. These contain footage that's right from the card, so you'll see the same exact folder structure on here. And all the video assets are right in the streams folder again. This is generally how I like to organize the projects that I shoot or the projects that I'm working on. Occasionally, if I have kind of general assets for projects, if I have music assets or photo assets, I'll put those in their own folder. So, for example, I have a Stock Photos folder, and inside here I have a bunch of stock photos. Most of them are photos that I've shot. And then I try and name the files in such a way that I can find them and use them. And then I can use them on several different projects. I do the same thing for audio. I have a big giant audio folder. And in that folder, I have sound effects, I have stock music, I have recordings that I've made, and all kinds of stuff. And that's handy to have because that's not located in a project folder here with kind of project-specific assets. So I can search those assets and use those assets on different projects and it's a little bit more convenient for me to work that way. So when I'm working on a project that has a lot of different assets from cameras and other sources, I like to put all of that into one big folder and get it organized in the way that makes the most sense to me. And that way, as soon as I get all of the assets from all the cameras and all the other sources, I can take my folder here and I can back that up to another drive. And that way, when I start editing, if something happens to the drive that I have the assets on, I have a backup with all the right folder structure. And I have all the files located exactly where I need them so that it's a very seamless process to use the other drive in the project file that I'm working on to start editing right away, and there's no down time. So make sure you're organizing your files and you're keeping things nice and tidy on your computer. And remember, if you're dealing with footage from a camera, you may need to keep the folder structure intact when you pull those files on your machine. Otherwise, they're not going to work properly once you get them inside of Adobe Premiere. So now that you have a basic understanding of how to organize your files, you're ready to go on to the next lesson, where you're gonna get a quick tour of Adobe Premiere Pro.


