
 Lessons: 43Length: 6.5 hours
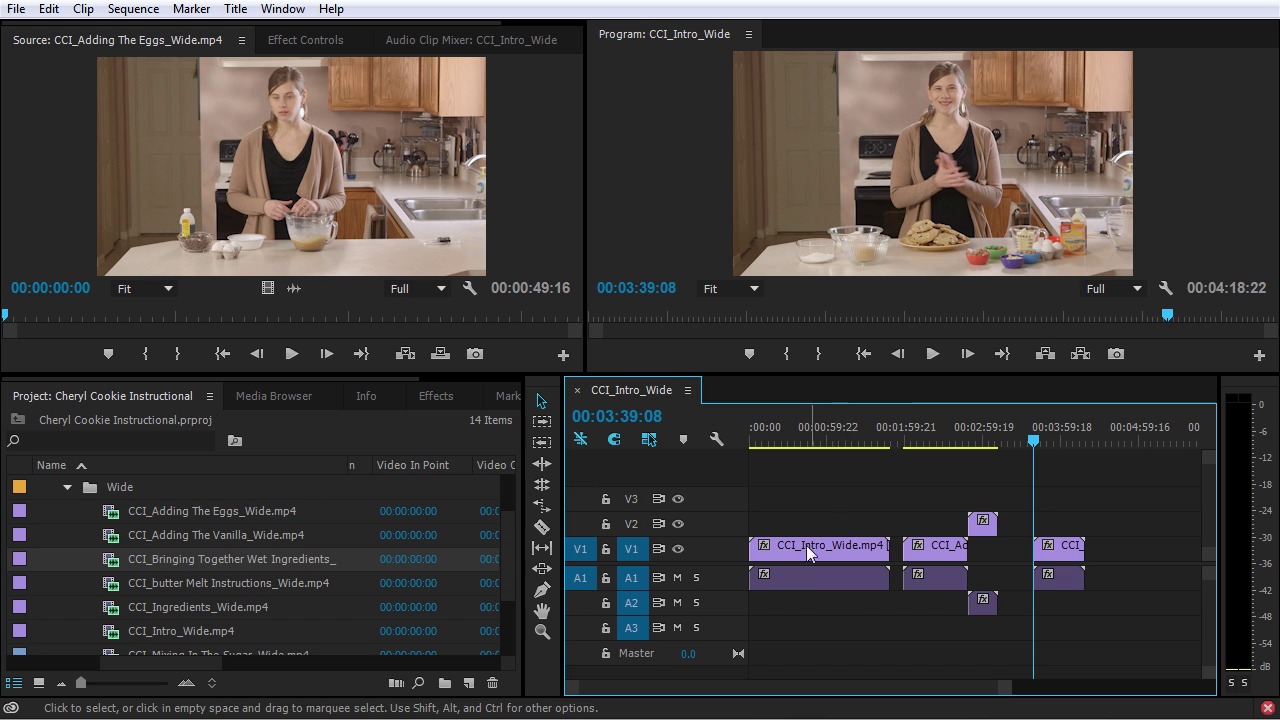
- Overview
- Transcript
4.1 Creating a Sequence
In this lesson you will learn to create a sequence and a few methods for adding shots to your sequence.
1.Introduction
1.1Introduction01:12
1.2What You Need07:14
2.Getting Started
2.1File Structure06:07
2.2Quick Tour of Premiere Pro11:14
3.Set Up Your Project
3.1Import09:55
3.2Organize08:39
4.Editing Basics
4.1Creating a Sequence10:07
4.2Cuts06:26
4.3Subclips06:46
4.4Editing in the Timeline, Part One11:27
4.5Editing in the Timeline, Part Two07:19
5.Beyond Basic Editing
5.1Adding a Cutaway Shot10:06
5.2Building on the Basic Edit, Part 107:09
5.3Building on the Basic Edit, Part 209:09
5.4Audio Transitions11:22
6.Fine-Tuning the Look and Sound
6.1Video Effects10:48
6.2Master Clip Effects10:47
6.3Adjusting the Volume of Your Tracks09:46
6.4Audio Effects11:17
6.5Adding Titles11:16
6.6Exporting12:10
7.Conclusion
7.1Conclusion02:33
8.Frequently Asked Questions
8.1FAQ Introduction01:22
9.Sharing
9.1Dynamic Link to After Effects12:44
9.2Exporting to HEVC for Faster Sharing Online06:39
9.3How to Export ProRes Video and Other Professional Formats07:17
10.New Audio Workflows
10.1Using the Essential Sound Panel for Dialogue: Part 111:58
10.2Using the Essential Sound Panel for Dialogue: Part 206:35
10.3Using the Essential Sound Panel for SFX and Ambience07:59
10.4Using the Essential Sound Panel for Music08:35
10.5Send Audio to Audition for Editing From Premiere Pro13:59
10.6Mixing Audio With Killer Effects Inside Premiere12:57
11.Essential Graphics Panel
11.1Use the Essential Graphics Panel to Create Basic Titles12:30
11.2Use the Essential Graphics Panel to Create a Motion Graphic Title in Premiere13:23
11.3Make Your Own Templates for the Essential Graphics Panel03:51
11.4How To Use Title Templates in the Essential Graphics Panel: Part 107:14
11.5How To Use Title Templates in the Essential Graphics Panel: Part 207:09
11.6How To Use Transition Templates in the Essential Graphics Panel08:26
12.Real-World Projects
12.1Use Proxies for Faster Editing13:42
12.2Create Multiple Camera Shots From a Single Camera10:56
13.New Features
13.1Using the Freeform View09:36
13.2Use Auto-Reframe to Crop Your Video09:36
13.3How to Work With Captions13:41
4.1 Creating a Sequence
In this lesson you will learn how to create a sequence and add your assets. Alright, to start off here I'm going to get rid of some of these extra bins that I created. I'm just going to select them and then delete them. I'm going to delete this audio bin here. I'm going to grab the Cheryl cookie instructional assets and pull that out of the footage bin here and then delete the footage bin, and now I have the same assets as what you have here. So I have the Cheryl cookie instructional assets and then the wide bin and the cutaway bin. So let's look at creating a sequence. A sequence is a collection of all your video, audio, photo, graphic and title assets and that's built in the timeline panel. But as you see it says timeline no sequences. That's because this project doesn't have a sequence yet. So you can create a sequence in a few different ways. The easiest way is to just drop a media clip right into the timeline panel. So if I just grab a wide shot here, let me go down to the intro, if I just drag that right over here. This will create a sequence and you can see over in the project panel here. I have a new item and this is a sequence. Now I should tell you that when you're dragging clips from the project panel you need to make sure you're grabbing right over the icon here. If you grab right here sometimes you can accidentally click and it'll select the text as if you are going to rename the clip. So make sure you're grabbing right on the icon. So if I come over here to the timeline window I can zoom out here and you can see what we have going on. Now we have a sequence to work with. You can see we have our clip here. We have our time ruler here which is showing us hours minutes seconds and frames, and time goes from left to right here. And then we have some video tracks and some audio tracks here. Now every sequence is going to have at least one video track, and any sequence with audio is going to have at least one audio track. By default when you create a new sequence it will oftentimes put more video tracks and audio tracks in the sequence so that they're kind of premade and ready to be used. But dragging clips over to the timeline window is not the only way you can make a sequence. You can also take any one of these clips. Let me grab a different one so we have a different name so I'm going to grab this bring it right over here to the new item button and you can see I have a new sequence. You can also right click in the blank space here and choose new item sequence and this will bring up the new sequence window. Let me just cancel out of this because you can also do that right down here and new item sequence, I'm going to cancel. You can also do that up here. File new. Where is it? Sequence which has also got the keyboard shortcut control "n". You can see in this window here we have a number of different presets so I could select this preset here and you can see in this description panel over here it tells me I'm going to have three video tracks and I'm going to have several audio tracks says three standard audio tracks and then it's going to give me three 5.1 audio tracks. That's not really something that I'm super interested in having. You can also go over here and modify some of those sequent settings as well. And what types of tracks you want. Over here and the tracks tab and then you can save your presets down here. But the easiest way again. Is to just drag one of your media clips to this new item and that will create a new sequence. And when you do that this sequence is created with the right frame size so you can see it's 1920 by 1080. it's the right time base, this is twenty 23.976 frames per second which is correct. It's the right pixel aspect ratio, which is one. It has the audio sample rate. And everything set up properly. So I want to get rid of the sequence here. I'm going to selected over here and just delete it and then I'm going to take this sequence right here CCI intro wide and I'm going to pull out of the Cheryl cookie instructional assets bins and going to put it in it's own bin called sequence. Now to add other assets to this it's very very easy and that can also be done in a number of ways. So you can take anything from the project panel and just click and drag that right over in your sequence. You can see as you're dragging it there are some lines that show up when you get to the edge of other media clips. And so this clip right here will snap to the edges of other media clips because snapping is turned on snapping is right here. It's also "s" on the keyboard. Items will also snap to the play head you can see right there. And so it's very easy to just pull things in from your project panel right into your sequence. Just going to select these guys here and delete them. I can also add multiple clips to my sequence at the same time so I can select a clip over here in the project panel and then shift-click down here and then just drag these over to my sequence. Going to lasso those and get rid of them. You can also control-click and bring those in as well. If I hold the control key down and I double click into this wide bin here that's going to go in to this wide bin you can see in the project panel now it says bin wide. And then right here I can go back up a level. So if I go into the wide bin and I change the view to icon view now we have even more control over how we can add these clips to the sequence. I'm just going to move this up a little bit so I can have just a little bit more room to work. Now, I can take this intro clip and I can move this to the beginning here. So now I have the intro clip first then I could take something like preheat oven, and I could bring that up as second and then maybe butter melt instructions and I'll put that third. Now I can take these three clips control-click them and then pull them in. And now they will be added in the correct order which is very Now when you're in icon view you have some sort options which you can find right down here. And currently it's set to user order but there are other ways you can sort this folder. For example if I change this to name now you're going to see that these are going to go in alphabetical order. Usually I like to have the set to user order and that way I can jump into the icon view and I can reorder things and then add them to the project. I'm just going to select these and delete them. So I want to go up a level and then up another level. So I'm back to my project base level here. I'm going to click list view because that's how I prefer to look at this panel. And now if I double click on one of these bins it'll pull up this bin in its own window and now I can take this bin and I could dock it right here so if I wanted to have the wide bin open so that I could see what's going on I could have that right there very conveniently and I wouldn't have to keep navigating in and out of these folders. I could just create a tab here I could do the same thing for the cutaway or double click that. This time it shows up in list view. But I can change that to icon view and then I can pull that right alongside my bin wide here. And now if I want to quickly get a visual idea of what these shots look like I could jump over to these tabs here. Now there are a couple of other ways to add clips to your sequence. One of those is right from the source monitor. So if I double click on a clip it's going to pull it up in the source monitor here and from the source monitor I can click anywhere inside this picture and then pull that down into the sequence and that will add this clip to the sequence. I can also drag just the video by hovering over this little filmstrip icon right here so I can click and drag and now I can just add the video portion of this clip. I can do the same thing with the audio. I'm going to select those and delete those. So you can use the source monitor for adding clips to your sequence as well. I'm going to jump back over here to this wide binn here as an additional way to add clips to the sequence when you select multiple clips. There's a button right down here it's called automate to sequence. And when you click this you get some options. You can see we can select the order and we can use the sort order or the selection order. And then we have several more options here. We can apply a default audio transitions we can apply default video transitions. And so we can have these added as well. If I zoom up on the timeline you can say or have audio transitions and video transitions. So it's just another tool that you can use to add clips to your sequences. You can do the same thing over here in the list view back to the project panel here. So I can select these guys here. I can click automate the sequence and then I can choose selection order or sort order. So if I wanted to add these in a particular order I could say selection order and then I could add them to the sequence that way as well. So there are many ways that you can add clips to your sequence and it's very very easy to do in the next lesson. You're going to learn how to mark the in and out points in your clips to make editing in the timeline much faster.


