
 Lessons: 43Length: 6.5 hours
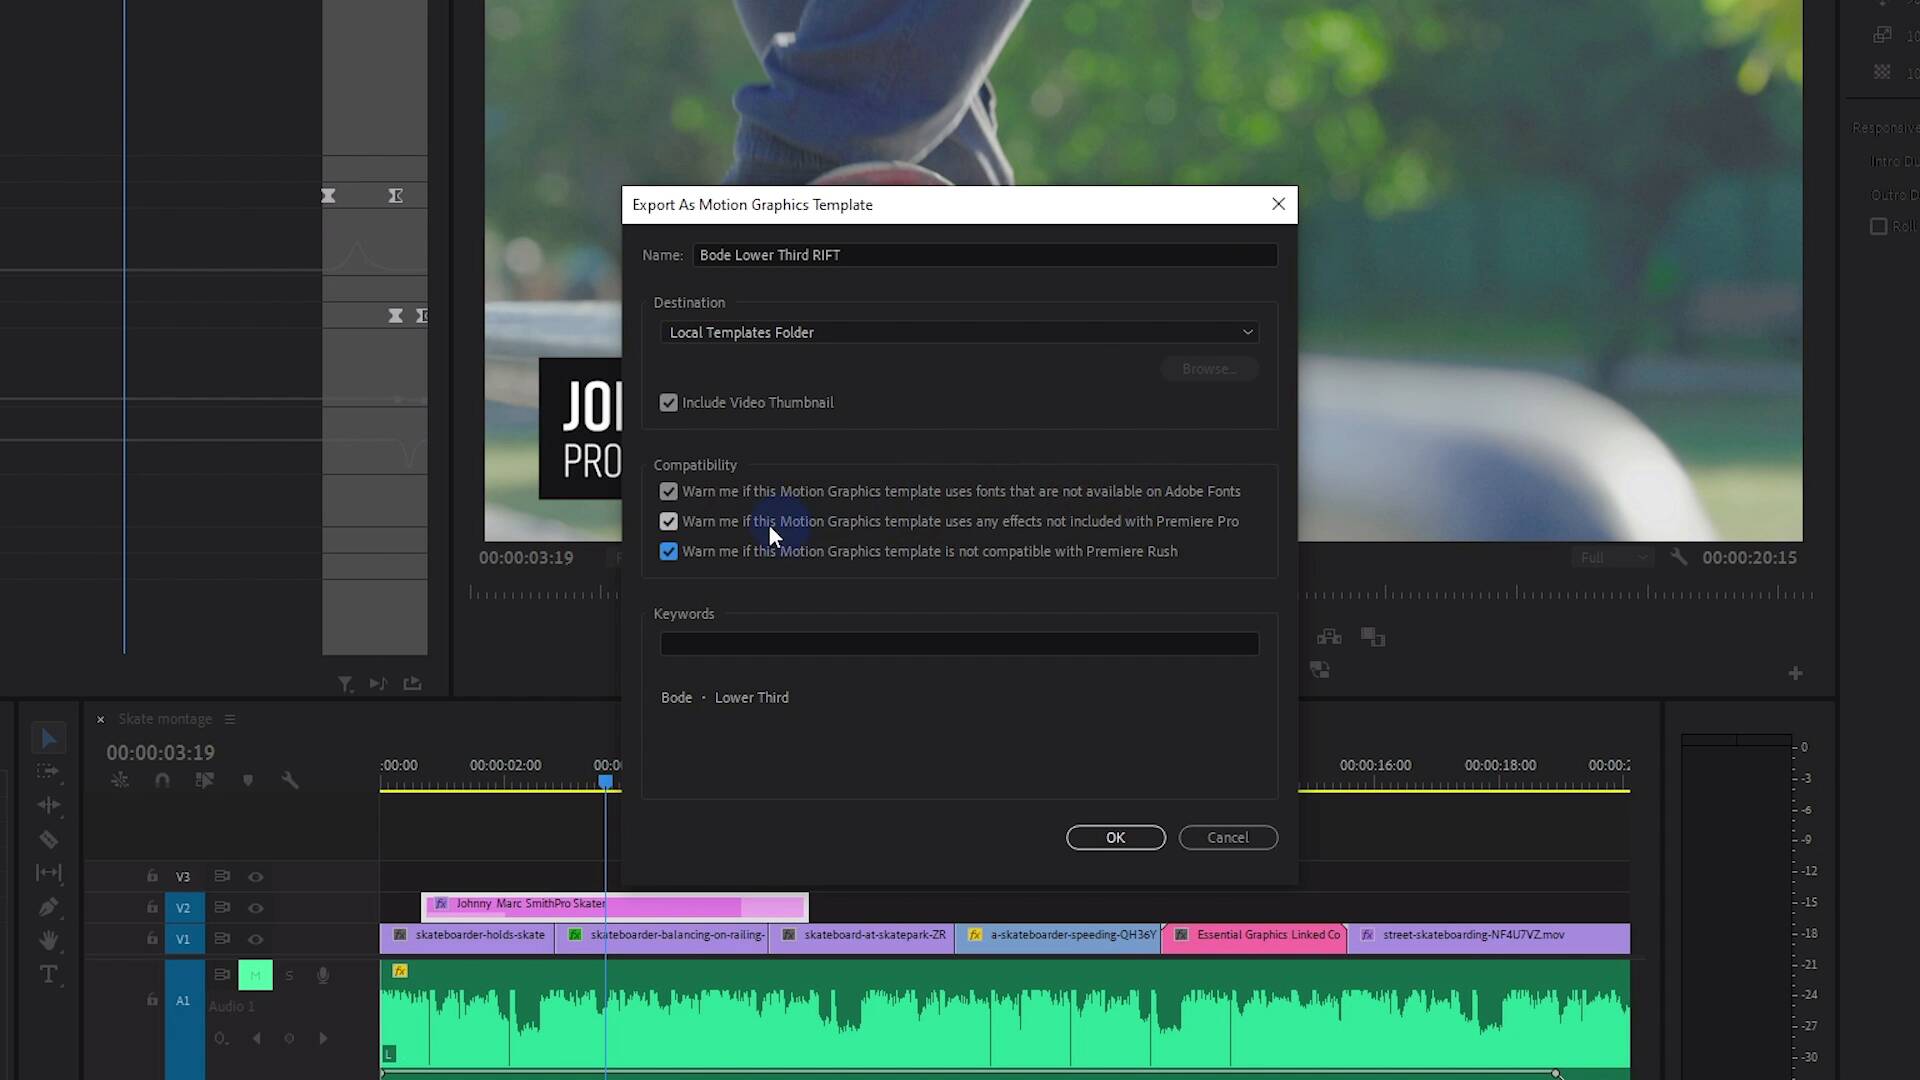
- Overview
- Transcript
11.3 Make Your Own Templates for the Essential Graphics Panel
In this lesson, you will learn how to make your own templates for the Essential Graphics Panel in Adobe Premiere Pro!
Related Links
- Titles Video Templates on Envato Elements
1.Introduction
1.1Introduction01:12
1.2What You Need07:14
2.Getting Started
2.1File Structure06:07
2.2Quick Tour of Premiere Pro11:14
3.Set Up Your Project
3.1Import09:55
3.2Organize08:39
4.Editing Basics
4.1Creating a Sequence10:07
4.2Cuts06:26
4.3Subclips06:46
4.4Editing in the Timeline, Part One11:27
4.5Editing in the Timeline, Part Two07:19
5.Beyond Basic Editing
5.1Adding a Cutaway Shot10:06
5.2Building on the Basic Edit, Part 107:09
5.3Building on the Basic Edit, Part 209:09
5.4Audio Transitions11:22
6.Fine-Tuning the Look and Sound
6.1Video Effects10:48
6.2Master Clip Effects10:47
6.3Adjusting the Volume of Your Tracks09:46
6.4Audio Effects11:17
6.5Adding Titles11:16
6.6Exporting12:10
7.Conclusion
7.1Conclusion02:33
8.Frequently Asked Questions
8.1FAQ Introduction01:22
9.Sharing
9.1Dynamic Link to After Effects12:44
9.2Exporting to HEVC for Faster Sharing Online06:39
9.3How to Export ProRes Video and Other Professional Formats07:17
10.New Audio Workflows
10.1Using the Essential Sound Panel for Dialogue: Part 111:58
10.2Using the Essential Sound Panel for Dialogue: Part 206:35
10.3Using the Essential Sound Panel for SFX and Ambience07:59
10.4Using the Essential Sound Panel for Music08:35
10.5Send Audio to Audition for Editing From Premiere Pro13:59
10.6Mixing Audio With Killer Effects Inside Premiere12:57
11.Essential Graphics Panel
11.1Use the Essential Graphics Panel to Create Basic Titles12:30
11.2Use the Essential Graphics Panel to Create a Motion Graphic Title in Premiere13:23
11.3Make Your Own Templates for the Essential Graphics Panel03:51
11.4How To Use Title Templates in the Essential Graphics Panel: Part 107:14
11.5How To Use Title Templates in the Essential Graphics Panel: Part 207:09
11.6How To Use Transition Templates in the Essential Graphics Panel08:26
12.Real-World Projects
12.1Use Proxies for Faster Editing13:42
12.2Create Multiple Camera Shots From a Single Camera10:56
13.New Features
13.1Using the Freeform View09:36
13.2Use Auto-Reframe to Crop Your Video09:36
13.3How to Work With Captions13:41
11.3 Make Your Own Templates for the Essential Graphics Panel
[MUSIC] In this lesson, you will learn how to take your essential graphic animation and export it as a motion graphics template. [MUSIC] So you've created a nice little animation here with the essential graphics panel, and you'd like to use this in other projects in the future. So what you can do is export this as a motion graphics template. All you need to do is right-click on your layer and choose Export as Motion Graphics Template. You can also find this up in the menu right here, Export as Motion Graphics Template, and it'll come up with a pop up window. And you can name this. I'm just gonna name this Lower Third, actually, yeah, I'll make it singular Bode Lower Third. I like to put my name on all the ones that I've created, because over here in this Browse menu, you may have noticed that there are a bunch of titles and graphics with very similar names. And when you download maybe a pack of these from Envato Elements, you'll find that a lot of them are named very similar. And so you may have a whole bunch of titles that are named lower third one, lower third two, lower third three, or basic lower third one, basic lower third, two. So I like to give them a unique identifier so that I can just type in my last name, Bode, and all the ones that I created will come up. You can also add keywords down here. I always like to add my name and then lower third. And then in the middle here, we have some compatibility warnings. And you can check these or you can leave them unchecked. Basically, it's asking if you want a warning if this template uses fonts that are not available on Adobe fonts. And warn me if this graphics template uses any effects not included with Premiere Pro. So if you're using any third party effects from something like Red Giant Universe, that would give you a warning. And finally, warn me if this motion graphics template is not compatible with Premiere Rush. Actually, I'm not so concerned about Premiere Rush because that's not something that I use all the time, but maybe you do, so you may want to have that checked. We have an option here to include a video thumbnail, and where do we want to put this here? If you put it in the local templates folder, it should auto populate in the Browse tab of the essential graphics panel here. That is the main place where you install motion graphics templates. So I will install this here. And I'll click OK. It's gonna go and export that. And then if I look over here and I search under my name, Bode, boom, check that out. Right here, Bode lower third rift. That's the one that I just created. And so I can now pull that into my project here. And I can update this text, With something different. And it works exactly as expected. So it's really quite simple to do. Coming up in the next lesson, I'm gonna show you how to use and install some of these third party templates you can find on Envato Elements. So check that out, coming up next. [MUSIC]


