
 Lessons: 43Length: 6.5 hours
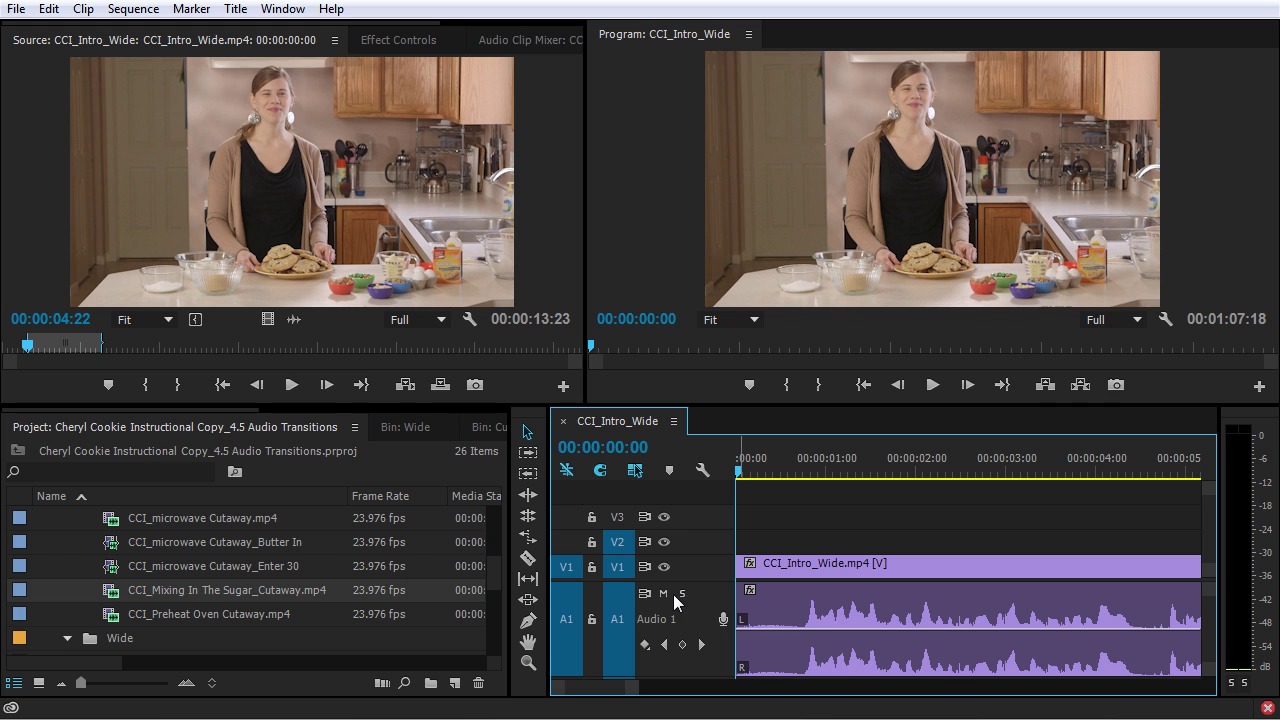
- Overview
- Transcript
5.4 Audio Transitions
In this lessons you will see how to finesse the audio by adding some audio transitions.
1.Introduction
1.1Introduction01:12
1.2What You Need07:14
2.Getting Started
2.1File Structure06:07
2.2Quick Tour of Premiere Pro11:14
3.Set Up Your Project
3.1Import09:55
3.2Organize08:39
4.Editing Basics
4.1Creating a Sequence10:07
4.2Cuts06:26
4.3Subclips06:46
4.4Editing in the Timeline, Part One11:27
4.5Editing in the Timeline, Part Two07:19
5.Beyond Basic Editing
5.1Adding a Cutaway Shot10:06
5.2Building on the Basic Edit, Part 107:09
5.3Building on the Basic Edit, Part 209:09
5.4Audio Transitions11:22
6.Fine-Tuning the Look and Sound
6.1Video Effects10:48
6.2Master Clip Effects10:47
6.3Adjusting the Volume of Your Tracks09:46
6.4Audio Effects11:17
6.5Adding Titles11:16
6.6Exporting12:10
7.Conclusion
7.1Conclusion02:33
8.Frequently Asked Questions
8.1FAQ Introduction01:22
9.Sharing
9.1Dynamic Link to After Effects12:44
9.2Exporting to HEVC for Faster Sharing Online06:39
9.3How to Export ProRes Video and Other Professional Formats07:17
10.New Audio Workflows
10.1Using the Essential Sound Panel for Dialogue: Part 111:58
10.2Using the Essential Sound Panel for Dialogue: Part 206:35
10.3Using the Essential Sound Panel for SFX and Ambience07:59
10.4Using the Essential Sound Panel for Music08:35
10.5Send Audio to Audition for Editing From Premiere Pro13:59
10.6Mixing Audio With Killer Effects Inside Premiere12:57
11.Essential Graphics Panel
11.1Use the Essential Graphics Panel to Create Basic Titles12:30
11.2Use the Essential Graphics Panel to Create a Motion Graphic Title in Premiere13:23
11.3Make Your Own Templates for the Essential Graphics Panel03:51
11.4How To Use Title Templates in the Essential Graphics Panel: Part 107:14
11.5How To Use Title Templates in the Essential Graphics Panel: Part 207:09
11.6How To Use Transition Templates in the Essential Graphics Panel08:26
12.Real-World Projects
12.1Use Proxies for Faster Editing13:42
12.2Create Multiple Camera Shots From a Single Camera10:56
13.New Features
13.1Using the Freeform View09:36
13.2Use Auto-Reframe to Crop Your Video09:36
13.3How to Work With Captions13:41
5.4 Audio Transitions
In this lesson, you will see how to finesse the audio by adding some audio transitions. So like I mentioned in the last lesson, I think this cut at this point is looking pretty good. But some of these audio transitions are not very nice sounding. They sound a little abrupt and a little rough around the edges. Now, you're going to learn more about effects in the next two lessons. But I did wanna go over some basic audio transitions which can be found right here in the Effects panel. So if you jump down here, underneath audio transitions, there's only one folder, and that's Crossfade, and there are three default audio transitions. You have Constant Gain, Constant Power, and Exponential Fade, and all of these do a very similar thing. When you apply one of these crossfades between two media clips with audio, the transition will fade one of the clips down in simultaneously fade the other clip up. And these three transitions differ in how much and how fast they crossfade, but they all do a very similar thing. You see that constant power here is highlighted as blue. And if I right-click on it, it's because this one has been set as the default transition. If I wanted to set Constant Gain, I would right-click and just set that there or exponential fade. But right now I have it set to Constant Power. Constant Gain crossfade changes audio at a constant rate in and out as it transitions between clips. This crossfade can sometimes sound abrupt, so that one I don't really use. The constant power crossfade creates a smooth, gradual transition which is more similar to the dissolve transition you might use between two video clips. This crossfade decreases audio for the first clip slowly at first then quickly towards the end of the transition. For the second clip, this crossfade increases audio quickly at first and then more slowly towards the end of the transition. So this is a pretty smooth audio crossfade right here. The exponential fade fades out the first clip over a smooth logarithmic curve or fading up the second clip, also over a smooth logarithmic curve. So again, all of these do a very similar thing. They fade out one clip while they simultaneously fade in the second clip. So let me show you exactly how these work. I'm gonna jump over here in the Timeline panel. And let's find one of these transitions that maybe could use a little bit of a crossfade between them. So I'm going to zoom in here right on the playhead with the plus key. And I'll play this little bit right here. >> Best of all easy. Hi, my name is Cheryl. >> So that's not super abrupt. But let's hear the difference when we apply a default transition. I can just drag one of these right over to the clip just like that. I'll just delete that. But it's probably going to be faster if you use the keyboard shortcut. The keyboard shortcut to apply the default audio transition is Ctrl+Shift+D. Ctrl+Shift+D will apply the default audio transition to any clips that are close to the playhead here. And you can see cuz these two clips are right on the playhead it applied that transition right here. So let's hear what this sounds like now. >> All easy. >> And maybe a touch smoother. >> All easy. >> Now, I can adjust the size of this transition. If I hover my mouse over you see that the selection tool changes from a trim tool, which it is right here to a kind of transition trim tool. So I can click and drag this and now it'll start fading out this clip sooner and fading this clip in sooner or the transition will happen over a longer period of time. So now if I play this audio transition here, >> All easy. Hi my, >> You can see it's making a nice smooth fade between these clips. Now, in order for this crossfade to work there has to be material after this edit right here in order to fade down. If this was the end of the clip and there was nothing after that, then this transition wouldn't have anything to fade down after this point, so it wouldn't work correctly. If I double click on this clip to bring it up in the source monitor, you can see that this is the end in the outpoint for this source clip that I have marked to use. Now, the portion of the source clip that I'm not using is called a Handle. The handle between the clips start point and the end point that I marked is sometimes called Head Material. And the handle between the clips out point and the end of the media is sometimes called tail material. So when you're applying these transitions, if there's not handles after this edit point and before this edit point or in other words, if there's not tail material here or head material here, this transition won't work properly. Because there won't be anything to fade up or fade down. But because there is, this is going to work fine. And in most cases, it's going to work just fine. Now, if I jump back to the beginning. If I tried to apply a default transition here, you can see that the transition applies. But again, there's not anything before this point to fade down. So essentially what this is going to do is just fade this clip up very, very subtly. Now, applying an audio transition to do a fade up in this particular case will work, but it's not usually my preference. What I like to use instead is audio clip key frames. So because I have this clip expanded, I can see the audio waveforms in here. If I collapse this down, I can't. But as soon as I expand this I can see audio waveforms, I can see what's happening on the left channel and the right channel. And there's a line In between here, and you can see as I hover over this, it says volume level. This is the volume level for this particular clip. And while my selection tools hovered over here, I can take this volume level and I can push it up, or I can click and drag it down. I'm just gonna undo that. I can also hold CTRL down, and if I click, I can add a key frame. If add another key frame over here, I can adjust the volume of this clip. So what I will frequently do is create my own audio transitions with clip volume level key frames. So I usually drop two key frames in and then I'll take one of them, and I'll pull it down. And so now, what's going to happen between this key frame and this key frame is the volume is going to start at negative infinity and then it's going to ramp up to zero decibels over this time period. And so now, listen to what's gonna happen. >> Have you ever had- >> It basically faded in the audio. Now, the reason why I like to use key frames in this situation over an audio transition is because it's faster. Let me just undo this for a second. The reason why it's faster is because I want this transition to happen between right here right when she just starts talking in the beginning of this clip. If I were to try to do that with an audio transition, what I'd have to do is apply the audio transition, and then I would have to adjust it out over here. But you see at this particular zoom level, I don't get that transition trim tool. What I have to do at this point is zoom in a level and then I can adjust the transition here. So that it will do a similar thing, and this for me is an extra step. It's much faster for me to just hover my mouse over here, CTRL, click, click, and then pull it down. For me, that's one less step and I can do that much, much faster. And now if I want to make any adjustments to these two key frames, maybe I want to shorten this transition here so I will hold Shift so that this key frame snaps to the position that it was previously in, I can move this over to the left. And I can even do that when I'm zoomed way out like this. You can see I can still grab these key frames and make adjustments which you cannot do to these transitions here, I cannot grab this transition and make an adjustment. Now, I still can't get to the transition adjustment from here but I have to go over here to the Effects controls. And because I have this transition selected, now I can jump up here and I can make an adjustment to it. Now, all of these methods are completely valid and they're completely useful. I'm just showing you my preference for fades at the beginning and the end of media clips. I typically will use clip volume key frames. So let's keep playing here and see what we can do to clean up the rest of the audio here. >> Bakery style chocolate chip cookies. First, >> You can see that transition does not sound super hot. So what I would probably do is see if there's enough audio here to extend this so we keep that kind of low level background noise in there, but we'll massage it a little bit >> Chip cookies, at first, let's- >> I'm gonna apply a default audio transition right here and then see how that sounds. >> First, let's go over- >> I think that sounds pretty good, but I probably wanna make this a little bit bigger. So what I would do is jump up here to the Effects controls panel and maybe pull this back a little bit. >> First- >> So I get a nice, clean breath there, and it's not short sounding. And then I might take this and drop two key frames right here and just pull this down so that this trilling noise comes down a little bit. >> First let's go over the ingredients. >> That to me sounds a little bit smoother. Let me jump to the next edit point by hitting the down arrow, and I'll hit it again. Actually, if I wanna get to the next edit on Video 1 and Audio 1, I'll just deselect Video 2 and then press down. And that will jump to the next edit point only on Video 1 and Audio 1. >> Before you start- >> So that sounds a little bit funny as well. Let me try another audio transition here. >> Before you- >> That made it perhaps a little bit smoother, but still there's something not quite right here. Let me just make a little space. I'm gonna delete this audio transition. And I'm just gonna zoom way up here. You can see on the waveform it looks like there's a little bit of noise and there's a little bit of junk here in the audio looks like there's a little bit of pop or something happens with the microphone right at this point. So there's not a great way to fix this. So what I might do is put two key frames here and two key frames here, I won't fade them all the way down, but I will reduce the intensity in this transition. >> Before you start- >> And that to me sounds just a little bit better. It sounds like this whole audio track on all these clips could use just a hair of denoising. But for right now, I think these audio transitions will help a lot. There's certainly a lot more to learn about working with audio in Premiere. But with these two things, audio transitions and clip volume key frames, you can very quickly massage the transition between your clips and make the audio sound much smoother. In the next lesson, you're gonna get a brief overview of the video effects available in Adobe Premiere Pro.


