
 Lessons: 43Length: 6.5 hours
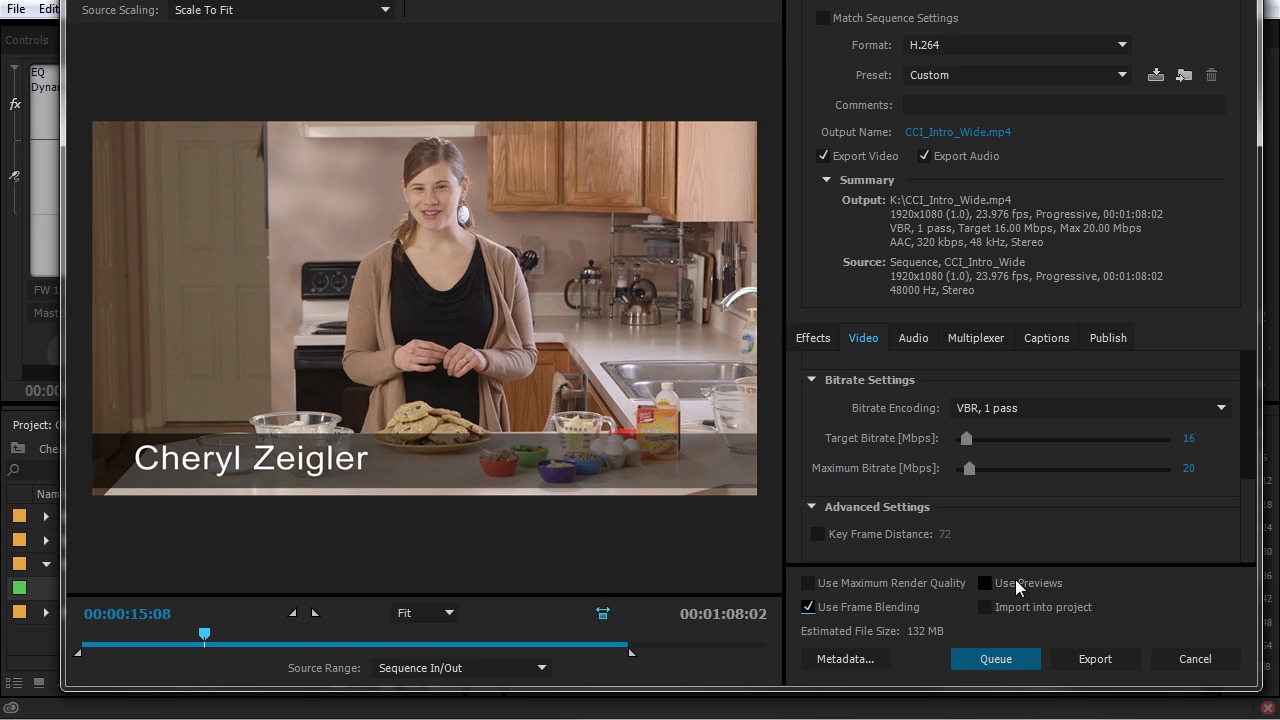
- Overview
- Transcript
6.6 Exporting
When you are finished with your project you will need to export your video. In this lesson you will learn how to use the Adobe Media Encoder to make that an easy process!
1.Introduction
1.1Introduction01:12
1.2What You Need07:14
2.Getting Started
2.1File Structure06:07
2.2Quick Tour of Premiere Pro11:14
3.Set Up Your Project
3.1Import09:55
3.2Organize08:39
4.Editing Basics
4.1Creating a Sequence10:07
4.2Cuts06:26
4.3Subclips06:46
4.4Editing in the Timeline, Part One11:27
4.5Editing in the Timeline, Part Two07:19
5.Beyond Basic Editing
5.1Adding a Cutaway Shot10:06
5.2Building on the Basic Edit, Part 107:09
5.3Building on the Basic Edit, Part 209:09
5.4Audio Transitions11:22
6.Fine-Tuning the Look and Sound
6.1Video Effects10:48
6.2Master Clip Effects10:47
6.3Adjusting the Volume of Your Tracks09:46
6.4Audio Effects11:17
6.5Adding Titles11:16
6.6Exporting12:10
7.Conclusion
7.1Conclusion02:33
8.Frequently Asked Questions
8.1FAQ Introduction01:22
9.Sharing
9.1Dynamic Link to After Effects12:44
9.2Exporting to HEVC for Faster Sharing Online06:39
9.3How to Export ProRes Video and Other Professional Formats07:17
10.New Audio Workflows
10.1Using the Essential Sound Panel for Dialogue: Part 111:58
10.2Using the Essential Sound Panel for Dialogue: Part 206:35
10.3Using the Essential Sound Panel for SFX and Ambience07:59
10.4Using the Essential Sound Panel for Music08:35
10.5Send Audio to Audition for Editing From Premiere Pro13:59
10.6Mixing Audio With Killer Effects Inside Premiere12:57
11.Essential Graphics Panel
11.1Use the Essential Graphics Panel to Create Basic Titles12:30
11.2Use the Essential Graphics Panel to Create a Motion Graphic Title in Premiere13:23
11.3Make Your Own Templates for the Essential Graphics Panel03:51
11.4How To Use Title Templates in the Essential Graphics Panel: Part 107:14
11.5How To Use Title Templates in the Essential Graphics Panel: Part 207:09
11.6How To Use Transition Templates in the Essential Graphics Panel08:26
12.Real-World Projects
12.1Use Proxies for Faster Editing13:42
12.2Create Multiple Camera Shots From a Single Camera10:56
13.New Features
13.1Using the Freeform View09:36
13.2Use Auto-Reframe to Crop Your Video09:36
13.3How to Work With Captions13:41
6.6 Exporting
When you're finished with your project, you will need to export it, so that it can be viewed on other devices. In this lesson, you will learn how to use the Adobe Media Encoder to make that process easy. So let's pretend that this project is at a point where we could call it finished. At least it's finished for now. Once you're set and you're happy with the way it looks and sounds, you're ready to export your project. Now you may have guessed, just like everything else in Premiere, there are a few ways you can go about exporting your project. In order to do that, you have to select the thing that you're going to export. If I wanted to export this sequence that we're working on, which is named CCI_intro_wide, I could do that by making sure my timeline panel is selected. I could make sure my program monitor is selected, or I can come over here and make sure that the sequence is selected in the Project panel. Then you could come up here to File > Export and choose Media, which also has the keyboard shortcut Ctrl+M. Then Premiere launches this export settings window here, and you can choose the format and all the individual settings that you wanna use to export your video. So let's look at exporting to a very popular format, which is H.264 video. This is pretty much the standard for web delivery. It's what Vimeo uses. It's what YouTube uses. So if I come down here under format and I choose H.264, under presets, kinda hard to see, let me just scoop this over. Under presets there are a bunch of standard presets that you can dial in. So way down here at the bottom, there are some presets for Vimeo just off the screen here. I'll just select one I'll choose Vimeo 1080P HD. And when you use a preset, it's going to set a bunch of parameters which we are going to briefly go over. Right here we can set the output name and also where you want it to save to. I'm just gonna leave it on the default, but you may want it to encode to a specific location. Export video is selected, export audio is selected. You do have the option to export either one or both. And then it gives you a brief summary of the settings that you have set up here. The output is set to 1920 by 1080 with a square pixel aspect ratio, which is correct. The frame rate is set properly which is 23.976 frames per second. It is progressive and not interlaced. The duration is one minute, eight seconds, and two frames. And then it has some of the encoding settings here. VBR stands for variable bitrate, one pass. The target megabit rate is 16 megabits per second. The maximum that it will use is 20 megabits per second. That is not megabytes per second. The audio is set to AAC 320 kilobits per second at 48 kilohertz. And it's set to stereo. And then it's giving you a brief summary of the source settings of the material that you are going to be exporting. Now if you were exporting at a lower resolution or a different format, you would set that up here. And you wouldn't necessarily need to edit your whole project in a smaller or lower resolution format. You can set up your sequences for whatever resolution makes the most sense for the source material, and then export to a lower resolution. Then down here you have the individual settings that you can set up. You have your Video tab, Audio tab, the Multiplexer, and then a few other options there that are not quite as important. There's also an Effects tab over here, which is not something that you need to worry about right now. Mostly you're gonna be focusing on this Video tab and this Audio tab right here. And you can see you can dial in all your settings. You have your resolution here, your frame rate, the field order, the aspect ratio. If you want to make sure everything is matched from your source, you can click this Match Source button, and then it will just set everything to the sequence settings. There's an option right here to render at maximum bit depth. This option improves the videos quality, but increases how long encoding takes. If you encode the video and you're seeing some banding or you're seeing some weird kind of crunchy looking artifacts, you may want to give it another go and then check this right here. Then you can adjust your overall bit rate, which is essentially the data rate that it's going to use to encode the video. So if you set this really high, you're going to have large files. If you set this really low, you're going to have smaller files. Now for this particular encoder, that's also going to have a direct correlation on the quality of the encode. Although, at some point, as you move to the right here, you're not going to see any more quality, but your files will still get bigger. So there's a point where there's diminishing returns. There's also a maximum bitrate setting here. If you for whatever reason didn't want your video to go above a maximum bit rate, you can set that right here. This is currently set up to the Vimeo standards. There's a key frame option down here. You're probably not going to need to mess with that too much. There's a couple more options down here. Use maximum render quality, this will give you better scaling, but increases the encoding time. If you're not changing the resolution of your video clips in your sequences, meaning you're not taking lower resolution clips and scaling them up, or taking higher resolution clips and scaling them down. You probably don't need to check this, you have the option to use something called frame blending. This creates a smoother motion by blending adjacent frames when the input rate doesn't match your output frame rate. Essentially, this means if you change the speed of any of your videos, this can help create a smoother motion. So because I took that very first cutaway clip, and I time stretch that to make it a little bit longer, I could check this and that would smooth that out just a little bit. Although it's probably not a huge deal because I didn't do a lot of time stretching there. You have the option to use Preview files. And this will use the preview files that you generated in Premiere to make things play faster for the final output, which is not something that you wanna do for your final deliverable files. This is only something that you may wanna use to get a preview in code quality, not a final quality for your videos. Finally, you have the option to import this into your project. If we jump over here to the Audio tab, you have some settings that you can adjust over here. The audio format that it's going to use to encode the video, your basic audio settings here, audio codec, sample rate. I'm gonna leave these all in their default. The bit rate, which is basically the quality, right now, it's just off the screen set to 320, which is the maximum that you can get with this particular setting. Over here there are just a few options. You see currently it's set to the source range, which is the sequence in and out. You can also set this to the entire sequence, which happens to be the same length or the work area or you can set it to something custom. You can also click and drag if you want it to render out a shorter area. Or if there is only a particular point in this video that you wanted to render, you could adjust the in point and the out point here. I'm gonna set this back to entire sequence. Finally, down here it shows you the estimated file size. If you're trying to encode to a specific file size, this can be an important number. If you're just looking for the maximum quality, then you're probably not gonna pay attention to this number. And not all formats will give you an estimated file size. When you're all set, you have two options. You can choose Q, which will send this over to the Adobe Media Encoder or you can choose Export. If you choose Export, the video will export immediately and you won't be able to work in Premiere until it's done exporting. So usually the best option is to hit Queue, and this will send it over to Adobe Media Encoder. When I hit Queue, it's going to export the project and then it's going to launch Adobe Media Encoder. And then it gets added right here. Before it starts encoding, you have the option to go back in and change any of those settings that we just went over. If it's good to go, you can just select Start Queue right here, and it'll start encoding the video. Now there is another way that you can export things from Premiere. And that is by just dragging things from the Project panel right into Adobe Media Encoder. For example, I'm just gonna slide this over a little bit. I can just grab this sequence right here and drag it right into Adobe Media Encoder. And it gets added. Now when it gets added, it may not be set up for the right encoding settings. So you can jump down here and you can set it if we wanted to have this, whoops, okay. It actually just started encoding that there. So I'm just gonna delete this. And I'm just gonna delete this. So let me try that one more time. I'm just gonna pull this right into Adobe Media Encoder, and it's set to H.264. I can change the preset here, if I wanted to. I could also just click right here and then it'll launch this export settings dialog box here. And I can make all of those same adjustments just like I just did. And it'll update here. I can also change where it's going to save. I'm just gonna delete this here. You can also grab your whole folder here if you have multiple sequences, and you can pull that inside of Adobe Media Encoder, too. I'm just gonna duplicate this with Ctrl+Shift+Backspace. And then I'll select the sequence folder here, and I'll hit Ctrl+M. And you see now the export window looks a little bit different because I'm going to be sending three sequences over. It doesn't give me that preview window here, but it's essentially exactly the same. So if I hit Queue, it's gonna export those over and they'll all show up right over here in Adobe Media Encoder. I'm gonna select all those and delete them. Now the one advantage that dragging things over to Adobe Media Encoder has is you can set up some presets and have your video encode to multiple different presets at the same time. So for example, I have this folder here that says MP4 low quality. It's a 720 format. You can see here, I'll just slide this over here for a second. If I wanted to take one of my sequences and have it be encoded with two different preset outputs, I can just drag it on this folder and check this out. Now, this one sequence has been added with both of these output formats. So if you have a situation where you need to encode something specifically for, let's say, Vimeo and then you want it to encode it for a client's website, they might have different standards. So you can create some presets here in Adobe Media Encoder. Click the new preset button here. Dialing your preset. You can name your presets. You can set up preset groups here. And then you can drag things right from Premiere on these folders here, and it will automatically set up both of those outputs. If you're using a particular preset a lot, say you're sending things to Vimeo all the time or sending things to YouTube all the time. You just set up that preset right over here and then you don't even have to go through the export settings dialog box in Premiere. You can just grab your files, pull them right over here into Adobe Media Encoder, you will have to launch the application first. But once you do that, you can just drag things right over here, and it'll set up the outputs for you. So now that you understand the basics about exporting your media, you're ready to go on to the last lesson in this course, where you're gonna learn some final tips and tricks to make all your editing projects a success.


