
 Lessons: 43Length: 6.5 hours
- Overview
- Transcript
11.2 Use the Essential Graphics Panel to Create a Motion Graphic Title in Premiere
In this lesson, you will learn how to use the Essential Graphics Panel to create a Motion Graphic Title in Premiere!
Related Links
- Titles Video Templates on Envato Elements
1.Introduction
1.1Introduction01:12
1.2What You Need07:14
2.Getting Started
2.1File Structure06:07
2.2Quick Tour of Premiere Pro11:14
3.Set Up Your Project
3.1Import09:55
3.2Organize08:39
4.Editing Basics
4.1Creating a Sequence10:07
4.2Cuts06:26
4.3Subclips06:46
4.4Editing in the Timeline, Part One11:27
4.5Editing in the Timeline, Part Two07:19
5.Beyond Basic Editing
5.1Adding a Cutaway Shot10:06
5.2Building on the Basic Edit, Part 107:09
5.3Building on the Basic Edit, Part 209:09
5.4Audio Transitions11:22
6.Fine-Tuning the Look and Sound
6.1Video Effects10:48
6.2Master Clip Effects10:47
6.3Adjusting the Volume of Your Tracks09:46
6.4Audio Effects11:17
6.5Adding Titles11:16
6.6Exporting12:10
7.Conclusion
7.1Conclusion02:33
8.Frequently Asked Questions
8.1FAQ Introduction01:22
9.Sharing
9.1Dynamic Link to After Effects12:44
9.2Exporting to HEVC for Faster Sharing Online06:39
9.3How to Export ProRes Video and Other Professional Formats07:17
10.New Audio Workflows
10.1Using the Essential Sound Panel for Dialogue: Part 111:58
10.2Using the Essential Sound Panel for Dialogue: Part 206:35
10.3Using the Essential Sound Panel for SFX and Ambience07:59
10.4Using the Essential Sound Panel for Music08:35
10.5Send Audio to Audition for Editing From Premiere Pro13:59
10.6Mixing Audio With Killer Effects Inside Premiere12:57
11.Essential Graphics Panel
11.1Use the Essential Graphics Panel to Create Basic Titles12:30
11.2Use the Essential Graphics Panel to Create a Motion Graphic Title in Premiere13:23
11.3Make Your Own Templates for the Essential Graphics Panel03:51
11.4How To Use Title Templates in the Essential Graphics Panel: Part 107:14
11.5How To Use Title Templates in the Essential Graphics Panel: Part 207:09
11.6How To Use Transition Templates in the Essential Graphics Panel08:26
12.Real-World Projects
12.1Use Proxies for Faster Editing13:42
12.2Create Multiple Camera Shots From a Single Camera10:56
13.New Features
13.1Using the Freeform View09:36
13.2Use Auto-Reframe to Crop Your Video09:36
13.3How to Work With Captions13:41
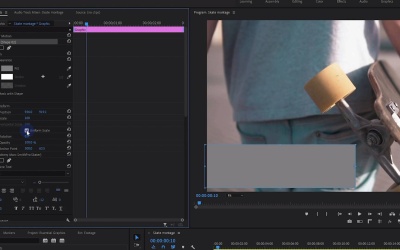
11.2 Use the Essential Graphics Panel to Create a Motion Graphic Title in Premiere
[MUSIC] In this lesson, you're gonna learn how to do some basic motion graphics, title animations, right inside premiere. So I have my basic skater sequence loaded up here and I want to do a nice little lower third treatment here. So I'm gonna grab the Type Tool and I'm gonna click to add some text. Now when I do, you can see it's already added a background. And when I start typing, It has the font that I want to use already selected. Notes because the essential graphics panel, will use whatever settings you have used last, which is pretty convenient when you are making multiple titles. So that you don't have to change the style and the font and the background in your stroke every single time. So that's why I have the background already selected here with 100% opacity and 35 units of padding. I don't know if that's pixels or percents. I don't really know what's going on with that. But there are 35.3 units of padding around. A lot of the work is already done. So that's quite nice. I might make a few tweaks here to the styling. There we go, something like that. Now, at this point, I just wanna throw a little bit of caution when you are making Graphics and you're trying to animate them inside of premiere. My advice is to keep it really simple. Although you can do a lot of complex things meaning there is the ability to add many, many layers over here and stack all kinds of effects. I wouldn't recommend it. Because the more complex that you make your essential graphics at least built inside of premiere. I would say the more likely it is that premiere will crash or there will be some kind of problem in the render, or even inside your project. In fact, I was recording this very lesson two days ago. And I was building just a really basic title animation here, very similar to this, but I was not using this background instead, I was using these rectangles here. That you can load up and I had these pinned to the text layer and I had maybe three of them. One of them was working as a mask. One of them was kind of a skinny bar along the side. And I was animating their position and scale. That's it. Super, super basic. Well, somehow, I had managed to corrupt my essential graphic Inside of premiere, and it made my entire program window turn black for the entire project. And it would not come back unless I switched the renderer underneath Project Settings general to Software only, which is not a great solution because that is extremely slow. I was on with support for over two hours trying to figure out what the problem was with premiere. I ended up installing an older version of premiere, an older version of After Effects, only to find out that right inside premiere, he did somehow created a corrupted, essential graphic. So although you can create some cool looking animations inside premiere, your mileage may vary. And I would recommend keeping it really simple, especially if you want your text to remain somewhat responsive meaning that if we add more text to this, your background will kind of scale along with that there. With that said, let's try and animate this a little bit right inside of premiere here. So over in the effect controls, I'm gonna start with a really simple sort of position animation. And I'll come out let's see a hold shift and then hit the right arrow 1,2,3,4,5,6,7,8, 8 times. That'll put me out about 40 frames and then I'll go back about one second, which is 30 frames. And every time you hold shift and then press either right or left arrow, it moves the CTI with the playhead here, five frames. So that is back 30 frames and I'm just gonna push this off the screen here, maybe hold shift there we go, so it's completely off the screen. And just to give me a little bit more wiggle room you might wanna push it over even farther. You can see the bounding box there in case you make a bigger title. So you may wanna just move it over like that. And I'll select my key frames here and choose bezzie A, and then actually, you know what? I won't do that. Instead I'll make this one ease in and this one, ease out. For me this is just an easier way to get the handles kind of closer to where they need to be because, as you can see, positioning these is not very easy. What I wanna do is drag this line straight out and there's no way to kind of constrain this handle to do that because it wanna move up and down just a little bit. But if you start with ease out on the first keyframe and ease in on the second one, it gets it pretty close and this is the curve that I wanna make here by twirling down the position. We can adjust the velocity of these keyframes here such that it kinda just flies out. [SOUND] So, let's check it out right here, yeah, just kinda like that. It doesn't look great right now, but I'm gonna add something else to this. And I think it'll look pretty nice. So, the next thing I wanna add is a rectangle. And what I wanted to do is I wanna make kinda a rectangle that starts over here. And I want it to scale up in this direction, and then basically fly off, and the effect is it's gonna look like a rectangle grows from over here and reveals the text. So I'm just gonna make the rectangle kinda cover up my text here. And then right at this point here, which is 10 frames out. So yeah, that's 10 frames. I am going to find my shape. And I'm gonna unlink the uniform scale here because I only wanna adjust the horizontal scale. And so right here, I want it to be at 100% scale. And again, I move the anchor point, if you didn't catch that before, this is the anchor point. And I move that and snapped it by holding down Ctrl, right here on the edge so that it scales from this point here. And then I'll go back to the beginning and set the scale to 0. When I go back to this same point here by the way, I'm getting the CTI to snap to these keyframes by holding shift. So right at 10 frames out, I'm gonna pop a position keyframe and I'm gonna move let's see, 1, 2,3,4,5,6, 30 frames. 6 times 5 is 30, yep. Okay, my math works out. I'm gonna hold Shift and just push this rectangle right off the screen. So this is basically what I have right now, like that. It really helps if you make sound effects when you're doing these graphics. It's just something I learned a long time ago. Now the keyframes on that don't look very good. So I'm gonna select these two and choose ease in and select the beginning to end choose ease out. That's gonna make it look a little better, but I still want to make a few adjustments to that. So I'm gonna twirl down position. I'm gonna drag this handle back and pull this handle out. We'll try to keep this line nice and smooth there and the same thing for scale. Let's see. So I'll drag that handle to the left and that handle to the left. There we go, maybe pull that one out just a hair. That looks pretty decent. Maybe I could make this a nice bright color that might look okay. Australia. There we go. That looks okay. Pretty cool. Now I probably wanna make this just a hair longer because up here in the effects controls, you'll see there's a little kind of blue rectangle right here. And if you drag this out, this will create a protected intro, essentially. And all of these keyframes here will be protected such that when we make this layer longer or shorter, it'll still maintain our intro animation here, which is pretty cool. We can do the same on the autro. And I think I will basically just reverse this whole process here on the outro. So I'm just gonna drop a keyframe here, and I'll go maybe 30 frames 1,2,3,4,5,6, it looks like I'm gonna have to make this just a little bit longer. Let's try that again. We'll start from here 1,2,3,4,5,6, and I will paste that second key frame right there. And we don't want the key frames to be exactly the same. But I'll adjust those in a second and then I'll go 10 frames so shift, right, right, and I'll set the scale to 0. Which will basically reverse that whole animation just like that. So key frames still look a little bit funky, but that's okay. I'm gonna do the same thing down here underneath the text position. I'll drop a keyframe and then go 30 frames 1,2,3,4,5,6 and then just basically paste this position and that should be good. So let's just play that, yeah. Keyframes are still a little hokey, no big deal. Maybe I'll have that one start a little slow. Cool, not bad. And then right here, I'll have this kind of start a little slower and maybe was really hard to see, what's going on here. Maybe it will zoom up here just a little bit. There we go. Maybe pull that handle out, let's try that. Hey, it looks pretty good, I like that. Maybe smooth that out, just a little here. Let's play that back. Cool not bad. So right here I'm just gonna trim it up to this point. And then I will create a protected Outro Duration, right about there. So here's our title, not bad. And then it'll basically reverse itself out pretty cool. So the nice thing about this is that and you can see down here, this is our protected outro in our protected intro. If I make this longer it's gonna hang around longer, but my intro and outro are still exactly where they should be. Now this is different to the way keyframes normally work in any other layer. Basically, if you take any other layer with key frames on it and you make it longer the key frames stay where they are. But now they're kind of glued to the end point and the end point. And even if I make this really, really short here in fact, I wonder if it'll hit a limit. And I guess the intro and the outro basically just compressed there, [LAUGH] which is kind of funny. If you make it too small, it just kind of shortens up the intro and the outro animation. I don't know if you could see that but make it really, really small here. Zip booked, okay. Yeah, I wouldn't recommend that. That's probably too short for folks to read, but, That's just a real basic animation that you can do with some simple keyframes. Now, there's a ton of different things that you can do over here. Using Effects you can make some nice kind of cinematic blurring titles and all kinds of things using graphics and photos in the mask capability of texts and shape layers to create all kinds Have really nice looking stuff. But again, I would recommend that you keep it on the simple side. I found that the more complex I make these essential graphics built in premiere, the more likely they are to give me problems down the road. Now that you've created this nice looking lower third year, wouldn't it be great if you could use it in other projects without having to build it from scratch? Well, you can I'm gonna show you how to make your own motion graphics template, from this essential graphics layer, coming up in the next lesson.


