
 Lessons: 43Length: 6.5 hours
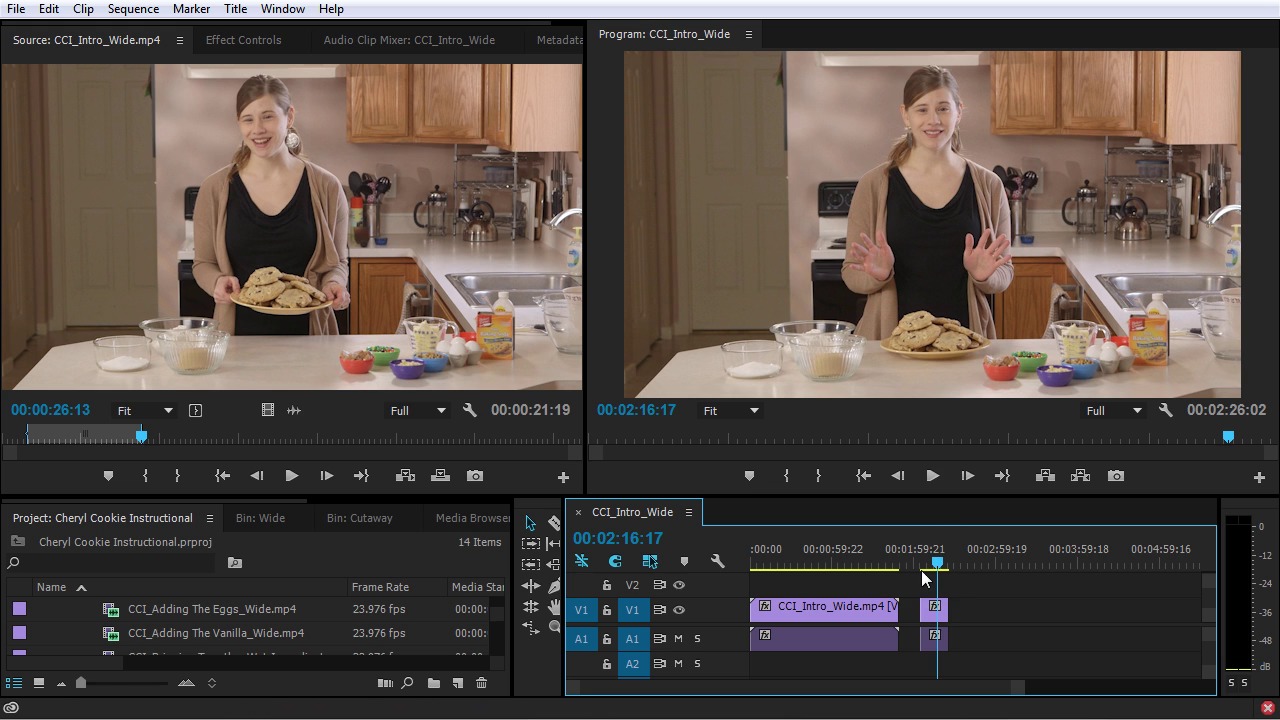
- Overview
- Transcript
4.2 Cuts
In this lesson you will learn how to mark the in and out point of individual clips before you pull them into your sequences. This will save you time when you are editing.
1.Introduction
1.1Introduction01:12
1.2What You Need07:14
2.Getting Started
2.1File Structure06:07
2.2Quick Tour of Premiere Pro11:14
3.Set Up Your Project
3.1Import09:55
3.2Organize08:39
4.Editing Basics
4.1Creating a Sequence10:07
4.2Cuts06:26
4.3Subclips06:46
4.4Editing in the Timeline, Part One11:27
4.5Editing in the Timeline, Part Two07:19
5.Beyond Basic Editing
5.1Adding a Cutaway Shot10:06
5.2Building on the Basic Edit, Part 107:09
5.3Building on the Basic Edit, Part 209:09
5.4Audio Transitions11:22
6.Fine-Tuning the Look and Sound
6.1Video Effects10:48
6.2Master Clip Effects10:47
6.3Adjusting the Volume of Your Tracks09:46
6.4Audio Effects11:17
6.5Adding Titles11:16
6.6Exporting12:10
7.Conclusion
7.1Conclusion02:33
8.Frequently Asked Questions
8.1FAQ Introduction01:22
9.Sharing
9.1Dynamic Link to After Effects12:44
9.2Exporting to HEVC for Faster Sharing Online06:39
9.3How to Export ProRes Video and Other Professional Formats07:17
10.New Audio Workflows
10.1Using the Essential Sound Panel for Dialogue: Part 111:58
10.2Using the Essential Sound Panel for Dialogue: Part 206:35
10.3Using the Essential Sound Panel for SFX and Ambience07:59
10.4Using the Essential Sound Panel for Music08:35
10.5Send Audio to Audition for Editing From Premiere Pro13:59
10.6Mixing Audio With Killer Effects Inside Premiere12:57
11.Essential Graphics Panel
11.1Use the Essential Graphics Panel to Create Basic Titles12:30
11.2Use the Essential Graphics Panel to Create a Motion Graphic Title in Premiere13:23
11.3Make Your Own Templates for the Essential Graphics Panel03:51
11.4How To Use Title Templates in the Essential Graphics Panel: Part 107:14
11.5How To Use Title Templates in the Essential Graphics Panel: Part 207:09
11.6How To Use Transition Templates in the Essential Graphics Panel08:26
12.Real-World Projects
12.1Use Proxies for Faster Editing13:42
12.2Create Multiple Camera Shots From a Single Camera10:56
13.New Features
13.1Using the Freeform View09:36
13.2Use Auto-Reframe to Crop Your Video09:36
13.3How to Work With Captions13:41
4.2 Cuts
In this lesson you will learn how to mark the in and out point of individual clips. This will really help speed up your workflow when you're editing in the timeline. So as you learned from the previous lesson, you can add clips from the project panel or the source monitor right into your sequences. And when we did that, we added the entire clip. And I know that because if I look at this clip right here and I zoom up on it here, I can see that there is a little white triangle here at the beginning and the end of this clip and these two triangles indicate the very beginning and the very end of this entire media clip. But often, you're not going to want to add an entire clip especially if you're working with raw camera files because usually, you'll have a little bit of noise or a little bit of camera motion before the part that you actually want to include in your sequence. And so, adding the entire clip to the sequence, and then editing those beginning and ending bits out is not the best workflow, especially if you have a bunch of other items in a sequence. A better way to do it is to define the in and the out points of individual clips before you add them to your sequence and this is called marking. So if I jump back here to the project panel, and I double click on the intro, that's going to open up here in the source monitor Now if I move the play head all the way back to the beginning and I hit the space bar on my keyboard to play this clip, you'll get an idea of what this looks like. >> I love that one. Sorry. >> Go from top. >> Okay, thank you. >> And we are ready for action. >> Okay, have you ever had a recipe for chocolate chip cookies that left something to be desired? It can be daunting trying to find just the right recipe. >> So you can see there was some stuff before Cheryl started talking that I really don't want to include in my edit. But if I pull in the entire clip, I have to then go in here and start making those changes, which is a little bit too much work. It's not the best workflow. So instead, I'm gonna mark the in and the out point, and I can do that in a few different ways. Right down here there's a mark in button, and there's a mark out button. So I can play. >> Thank you. >> And we're ready for action. >> Okay. >> And so right before Cheryl starts talking which is right here, and then I can click the mark in button. I can also use I on the keyboard as a shortcut and then I can go to where she's done talking and then mark the out point. >> Have you ever had a recipe for- >> So I'll just scrub along here. So it's right about here's where Cheryl stops talking. >> Bakery style cookies. The glare and I'm gonna show you in this video how to make big bakery style cookies. >> So right about here, I'll mark an out point. And when I do that, you can see that now there is this in out point selection which is showing me where I've marked the end and the out point in this entire clip. Now, if I were to make a little space in my sequence here and pull this clip in, you can see that this media clip is much shorter. This is the same exact clip as right here. These are both the CCI intro wide clips. But this clip is only the part that I really want, and this makes editing a lot easier because now, I don't really have to pull in a lot of junk that I don't need into my sequence. I can streamline that, and I can pull in just the stuff that I really need. And so let's try this with another clip. I'm gonna double click on adding to vanilla and that's gonna bring that up in the source monitor here. And you can see that it says that right here, source CCI adding the vanilla_wide. So if I play this, >> Okay and action with the vanilla. >> We're gonna measure one tablespoon. >> You can see right about there is where I want to mark the in point. So I want to back the playhead up a little bit, and then play it again. >> We're gonna measure. >> I'm gonna go back a little farther. So right about here, I'm gonna mark an endpoint and this time I'm going to do it with a keyboard shortcut which is I, then I'm gonna play to the end. >> We're gonna measure one tablespoon of vanilla. Usually recipes call for a teaspoon, but you'll get a really great flavor by using triple that and a tablespoon for this recipe. >> So I'm just going to start playback with the space bar and then I'm going to press O on the keyboard and that's going to mark the out point. Now you don't have to get really specific with the in and the out points in the source monitor. This is more of a higher level marking of the in and the out point and then you can get into the refining of the actual edit points once it's in your sequence. And then you can see how well it flows from the previous clip and trim up the beginning and the end to make it really nice, but this is the process you want to do before you add this to your sequences. Now, you can also do this in this thumbnail view here. If I select one of these clips, and this time I selected adding the vanilla, you can actually see that the in and out points are already marked and highlighted by this blue line here which makes it really easy. But if I select another clip here, I can hit play and it'll play right down here. I'll make this a little bit bigger so you can see And I can mark in and out points right from the project panel as well. So, I can select this clip. >> [INAUDIBLE] >> And right from here, I can just hit I. >> [INAUDIBLE] >> Scrub to the end, And then hit O. Now if I double click, it'll bring it up in the source monitor and you can see I've done the same exact thing right here, I've marked my and my out points. So it's another way that you can do it. It works really well for quickly marking in and out points because you can do it right here. You don't have to bring it up in the source monitor. It also gives you way to view where those in and out points are without bringing it out to the source monitor which is pretty cool. So that's how you mark your in and out points and then when you bring them out into your sequence, they are all trimmed out for you and they are much easier to work with. In the next lesson, you're gonna go one step further with this idea and learn how to create sub clips from a longer clip


