
 Lessons: 43Length: 6.5 hours
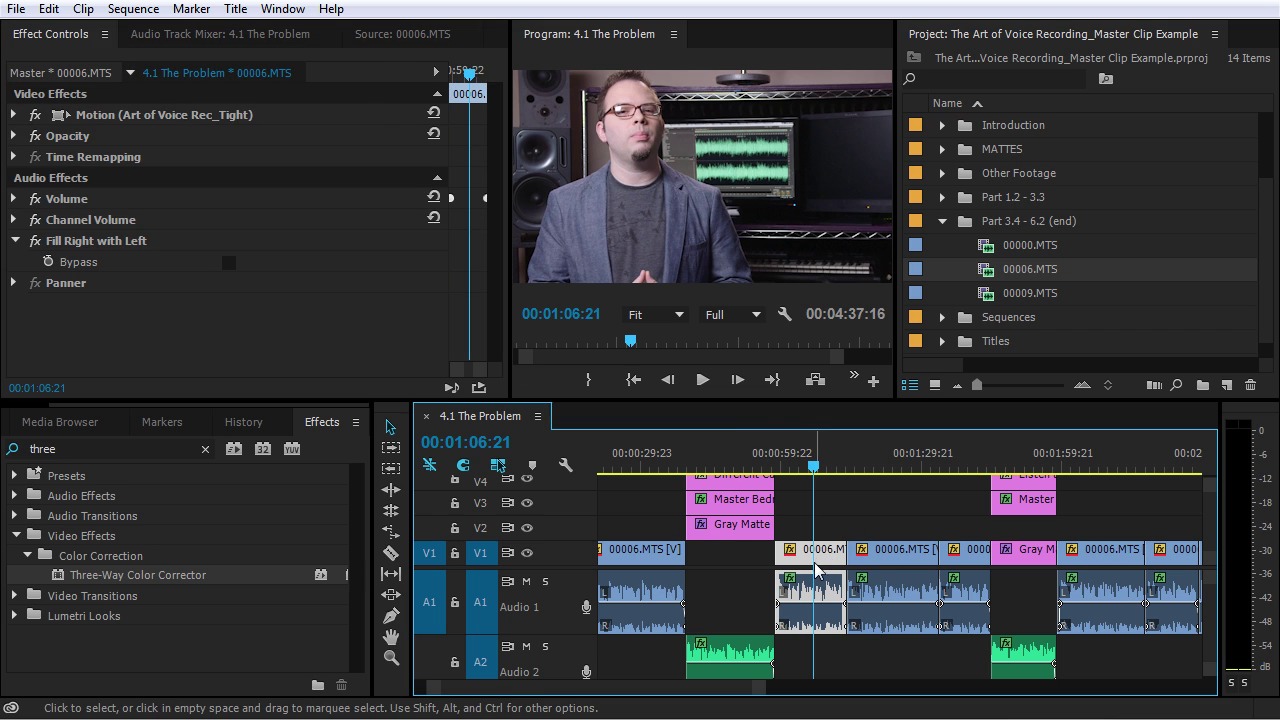
- Overview
- Transcript
6.2 Master Clip Effects
One of the most useful features in the recent versions of Premiere is Master Clip Effects, and in this lesson you will learn how they work.
1.Introduction
1.1Introduction01:12
1.2What You Need07:14
2.Getting Started
2.1File Structure06:07
2.2Quick Tour of Premiere Pro11:14
3.Set Up Your Project
3.1Import09:55
3.2Organize08:39
4.Editing Basics
4.1Creating a Sequence10:07
4.2Cuts06:26
4.3Subclips06:46
4.4Editing in the Timeline, Part One11:27
4.5Editing in the Timeline, Part Two07:19
5.Beyond Basic Editing
5.1Adding a Cutaway Shot10:06
5.2Building on the Basic Edit, Part 107:09
5.3Building on the Basic Edit, Part 209:09
5.4Audio Transitions11:22
6.Fine-Tuning the Look and Sound
6.1Video Effects10:48
6.2Master Clip Effects10:47
6.3Adjusting the Volume of Your Tracks09:46
6.4Audio Effects11:17
6.5Adding Titles11:16
6.6Exporting12:10
7.Conclusion
7.1Conclusion02:33
8.Frequently Asked Questions
8.1FAQ Introduction01:22
9.Sharing
9.1Dynamic Link to After Effects12:44
9.2Exporting to HEVC for Faster Sharing Online06:39
9.3How to Export ProRes Video and Other Professional Formats07:17
10.New Audio Workflows
10.1Using the Essential Sound Panel for Dialogue: Part 111:58
10.2Using the Essential Sound Panel for Dialogue: Part 206:35
10.3Using the Essential Sound Panel for SFX and Ambience07:59
10.4Using the Essential Sound Panel for Music08:35
10.5Send Audio to Audition for Editing From Premiere Pro13:59
10.6Mixing Audio With Killer Effects Inside Premiere12:57
11.Essential Graphics Panel
11.1Use the Essential Graphics Panel to Create Basic Titles12:30
11.2Use the Essential Graphics Panel to Create a Motion Graphic Title in Premiere13:23
11.3Make Your Own Templates for the Essential Graphics Panel03:51
11.4How To Use Title Templates in the Essential Graphics Panel: Part 107:14
11.5How To Use Title Templates in the Essential Graphics Panel: Part 207:09
11.6How To Use Transition Templates in the Essential Graphics Panel08:26
12.Real-World Projects
12.1Use Proxies for Faster Editing13:42
12.2Create Multiple Camera Shots From a Single Camera10:56
13.New Features
13.1Using the Freeform View09:36
13.2Use Auto-Reframe to Crop Your Video09:36
13.3How to Work With Captions13:41
6.2 Master Clip Effects
One of the most useful features in the recent versions of Adobe Premiere Pro is Master Clip Effects, and in this lesson, you will learn how they work. In the last lesson, you got a basic overview of how to apply video effects to individual clips, and apply them to something called an adjustment layer to effect multiple clips that fall on the tracks below where that adjustment layer is placed. Both of those methods of applying effects are very, very useful, and I expect you'll be using them quite a bit. However, sometimes you're going to have to apply effects to the same source clip over and over and over. And depending on how your sequence is arranged, using an adjustment layer may not be the easiest option. Adobe has come up with a really great solution for this called Master Clip Effects, and let me show you how it works. So you're obviously looking at a different project here, and this is another course that I produced recently called the Art of Voice Recording. Unlike the source files, you have to work with this project is made up of the raw camera files, which is why these clips are named 00006.MTS. Now let's imagine that I wanted to apply a color correction to this clip. Let me just back up here in the sequence. You can see in this particular sequence, I'm using this clip right here multiple times. And I have some other clips that I'm using as well, but I'm using this quite a lot. Now if I wanted to apply, let's say, a color correction to this clip right here, I would most likely want to apply it to all of those clips in the sequence because if I needed to fix something with the coloring, or the look of this clip, I would want it to be applied to all of the instances. Then I'm using this clip in this sequence. Now I could copy and paste the effect to multiple clips, but the problem with that is, if I went back and I made an adjustment to one of them, then I would have to delete all of the other effects, and then re copy, and re paste it over all of these instances of this 00006.MTS. That is super, super tedious. Now I can also use an adjustment layer. But at the moment, you can see that I would have to move some layers around, and then drop an adjustment layer in here. Now I could do that but there's a much easier way to do it. And the cool thing about this is, it not only affects the clips in this sequence, but it'll affect the clips in any sequence that this master clip is used. Master clips are objects in the Project panel other than sequences, multi camera source sequences and bins. Examples of master clips include merge clips, sub clips, and synthetic clips, such as adjustment layers and color mats. When you apply an effect to a master clip, the effect automatically ripples down to all of the sequence clips created from that master clip. Let's say for example, I wanted to apply a three way color corrector to this clip. To apply this effect to the master clip, I can drag this effect from the effects panel here to the Project panel where this clip is located. I can drag it to the source monitor up here, or I can drag it to the effects Control Panel if I'm looking at the master clip. Now how do I know if I'm looking at the master clip? Well, in order to open the master clip, what you do is select the clip, and then you press F on the keyboard. You'll see that that opens it up in the source monitor here. And now if I jump over to the effects controls, you'll see that there's nothing listed. Now this looks very similar to the normal way you would get clips in the source monitor, which is to just double click on them, but it's a little bit different. If I come to this clip right here, and I double click on it, it'll come up on the source monitor here. But if I go over to the effects controls, you'll see all of the default effects that are on this clip. Because I'm not actually looking at the master clip, and I know that's a little bit confusing. But in order to view the master clip, what I have to do is select the clip and press F, and now you'll see that the view is a little bit different. And now if I look at the effects controls, I don't see any of those default effects like motion, opacity, time remap, volume, etc. So now, to apply this three way color corrector, I can grab it from the Effects panel, and drag it right up here. Or, if I'm looking at the master clip right here, I can take this effect and drag it right to the source monitor. And you'll see that now, it's actually doubled up on here because I did it twice. Let me delete both of these. And the other way is I can drag this effect from the effects panel right to the Project panel where this master clip is located. So in order to find it in the Project panel, I'm gonna right click right here, and then choose reveal in project which is just off the screen. And when I do I see hey, it's right here. Now I'm gonna temporarily dot the project panel over here so I can drag the effect to it, but I;m just gonna drag this effect right here to 00006.MTS. And now if I come back here and I hit F. And I go to the effects controls, you'll see that there's a three way color corrector on this master clip. Now, how do I know it's just on the master clip? Well, if I click on the child clip, or the clip that is in a sequence, you'll see that that effect is not applied. So I know that that effect is on the master clip. So let me bring that up again. And I'll make an adjustment to it here so you can see exactly what it's gonna do for now. I'm just gonna put this back down here, where it goes. So I'll do something drastic to this, just so you can see what's going on here. Just make this just kinda crazy looking. Just jack up the contrast real bad, maybe, maybe not so bad. I'll just give it a very distinct look. Now, even though it looks like it's only applied to this clip right here. If you look, it's applied anytime this clip is used. And again, that effect is not on these individual clips. See this clip is selected, and in the effects controls panel, you don't see a three way color corrector here. That effect is applied anytime this clip is used in any sequence in your project. Just to show you, I have another sequence here that's using the same clip multiple times. And you can see, It's definitely applied to this clip as well. And this is in a completely different sequence. It's the same exact clip. So Master Clip Effects are a really powerful tool to be able to apply color correction and other effects, to clips that you use multiple times throughout your sequence, or that you use in multiple sequences. And again to get to the master clip, you select the clip, then you press F, right from the timeline panel here, or you can apply the effects to the clips in the Project panel here. And you can apply those master effects to just about anything that's not a sequence', a multicam sequence or a bin. So I can even apply that to something like a color map. So let's say I wanted to use a gray mat here for some reason. If I select this gray mat, and I hit F, jump over here to the effects controls, you see there's no effects on it. Oftentimes when I use color mats, especially darker color mats, I like to throw a little noise on here. So I'll jump down here and I'll grab a noise. I'll pull that up to the effects controls here on the master clip. And I'll add just a little bit of noise that's way more noise than I would normally use. But now every time I use this, so I'll come back here to the Project panel, and I'll pull out another gray map. Check it out, on this gray mat I also have noise. And if I look in my sequence here, I'm guessing right here, I have another instance of that. Now I didn't mess with this at all. If I click on this, you'll see that there's actually a noise already applied to this. But take this noise off though, you'll see that the other noise is applied to this as well. And if I look at this at 100%, you'll see check that out. There's that nasty noise that I put on to the master clip. And I can get to that anytime I want just by selecting the clip, and pressing F, and jumping over to the effects controls, and I can make all of my adjustments right here. This also means that you can set up something like an adjustment layer, if you wanted. So, I can make an adjustment layer. We just set this back to fit here. I'll hit F on the keyboard, jump to the Effect Controls, pull up something like curves. Draw our curves on here, and maybe give this just a light amount of contrast. And then I can actually rename this over here to light contrast. And now every time I wanted to add a little bit of contrast to something, I don't even have to apply an effect, I can just grab this light contrast adjustment layer. And I just add a contrast to that. Check this out. [LAUGH] All right, that may be a little bit subtle. Let me find somewhere else that may be a little bit more visible. All right, here we go. I dropped this adjustment layer here, boom. Now I have a light contrast adjustment right here. Let me turn that on and off. Check that out. A lot of times I'll be working with my footage, and maybe I'll dial in the color. And then after looking at it for a while, I'll say you know what, that doesn't look quite right. And so if I applied that three way color correction to individual clips in the sequence, that would be a nightmare to try and fix. Now I have to make the adjustment here, and then select all the instances of that clip. Remove all of the effects, copy the effect, and then paste it back through all those clips, way too much work. If I wanna make an adjustment, I just press F. I jump over here to the Effects Controls, and then I make my adjustment. Maybe dial this back a little bit. See what that looks like. Nice, maybe a little bit too much contrast here. Maybe boost up the saturation a little too much there. And now every time this is used, I have that same exact setup. So Masterclip Effects is a really handy feature to have. In the next lesson, you will learn how to adjust the volume of your tracks, so they sound more appropriate for your video.


