
 Lessons: 43Length: 6.5 hours
- Overview
- Transcript
13.3 How to Work With Captions
In this lesson, you will learn how to create and export captions in multiple formats!
1.Introduction
1.1Introduction01:12
1.2What You Need07:14
2.Getting Started
2.1File Structure06:07
2.2Quick Tour of Premiere Pro11:14
3.Set Up Your Project
3.1Import09:55
3.2Organize08:39
4.Editing Basics
4.1Creating a Sequence10:07
4.2Cuts06:26
4.3Subclips06:46
4.4Editing in the Timeline, Part One11:27
4.5Editing in the Timeline, Part Two07:19
5.Beyond Basic Editing
5.1Adding a Cutaway Shot10:06
5.2Building on the Basic Edit, Part 107:09
5.3Building on the Basic Edit, Part 209:09
5.4Audio Transitions11:22
6.Fine-Tuning the Look and Sound
6.1Video Effects10:48
6.2Master Clip Effects10:47
6.3Adjusting the Volume of Your Tracks09:46
6.4Audio Effects11:17
6.5Adding Titles11:16
6.6Exporting12:10
7.Conclusion
7.1Conclusion02:33
8.Frequently Asked Questions
8.1FAQ Introduction01:22
9.Sharing
9.1Dynamic Link to After Effects12:44
9.2Exporting to HEVC for Faster Sharing Online06:39
9.3How to Export ProRes Video and Other Professional Formats07:17
10.New Audio Workflows
10.1Using the Essential Sound Panel for Dialogue: Part 111:58
10.2Using the Essential Sound Panel for Dialogue: Part 206:35
10.3Using the Essential Sound Panel for SFX and Ambience07:59
10.4Using the Essential Sound Panel for Music08:35
10.5Send Audio to Audition for Editing From Premiere Pro13:59
10.6Mixing Audio With Killer Effects Inside Premiere12:57
11.Essential Graphics Panel
11.1Use the Essential Graphics Panel to Create Basic Titles12:30
11.2Use the Essential Graphics Panel to Create a Motion Graphic Title in Premiere13:23
11.3Make Your Own Templates for the Essential Graphics Panel03:51
11.4How To Use Title Templates in the Essential Graphics Panel: Part 107:14
11.5How To Use Title Templates in the Essential Graphics Panel: Part 207:09
11.6How To Use Transition Templates in the Essential Graphics Panel08:26
12.Real-World Projects
12.1Use Proxies for Faster Editing13:42
12.2Create Multiple Camera Shots From a Single Camera10:56
13.New Features
13.1Using the Freeform View09:36
13.2Use Auto-Reframe to Crop Your Video09:36
13.3How to Work With Captions13:41
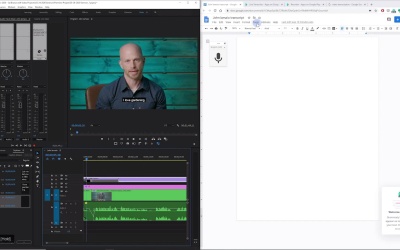
13.3 How to Work With Captions
[MUSIC] In this lesson you are going to learn how to create and export captions in Premiere Pro. [MUSIC] Creating captions in Premiere Pro is really easy. You can just come over here to the Project panel, right click on a blank area Come up to new item and then choose caption. You can also get to a new item down here with the New Item button. Now there are a few different options under the standard drop down here. We have CES 608 and several others and Adobe's documentation on what these are or why you would want to use them is not fantastic. In fact, it's almost non existent What I have learned is this 608 is for analog broadcasts. 708 is for digital broadcasts. teletext is used in some pal countries Australian is used in Australia. Open subtitling can be burned into the video, or it can be exported as a sidecar file but it doesn't offer any styling and it looks pretty terrible. So I think the best bet for most folks is open captions and that's what I'm gonna use right here. You wanna make sure that your time base is Your resolution match your project. These do so I'm going to click OK. And you can see that was added over here in my project panel. I'm just going to drag that out on the timeline In line here and extend it all the way to the end of the sequence. Now I'm not gonna make captions for this entire one minute and 50 seconds portion. But I'll just show you a little bit here at the beginning. So you can see how it works. If I click on my caption item in the timeline, and I come over here to the caption window, and if you don't have the caption window open, you can find that right up here, underneath Window and then Captions. And you'll see I have a bunch of styling options and you can see my captions being displayed right here. So by default, these type of open captions will be burned into the video so that will be appropriate for your facebooks and your Instagrams and Many other types of social media platforms where you want the captions burned in. A lot of times when you're scrolling through the social feed, folks like to read the captions without turning on sound. And so that's very handy to do that. But you have the option with open captions to export the file separately export the captions file. And so you can get a clean version of your video with a separate Subtitle file. And I'll show you that in just a few minutes here. So the process of creating captions is really simple. You can see it created one caption here, one kind of block of text. And in the timeline, you can adjust the end point and the out point. So I'm just going to leave the endpoint where it is and adjust the out point to right about here where I can see there's a blank Spot in this dialog waveform here and if I play the audio. >> Let me tell you a little story about disappointment from my life. >> I'm going to type that over here. There we go. A couple of things you want to keep in mind. long lines like this don't always work for captions when you export them as a sidecar file, because when you export them and they are Displayed in another application like YouTube, or if you are viewing them on a media player like VLC, you don't have control exactly on how the line is broken up and if the player will word wrap this so If the settings in the player that you are viewing this back are such that this line is too long to fit on screen it may or may not, break it automatically put the words on a second line, so it's probably safest to just manually do a line break by hitting enter here and putting longer lines like this on two separate lines. I'd also probably center this up and. Probably make this a little bit bigger, something like 45 or something like that. And you can adjust the font, the font style, the size and a bunch of other parameters from full bold to italic. You can set the background color, you can set the font color and all of that. That's not going to affect the sidecar file, that's only going to affect the burned in captions to add another capture. Action here, we can just click the plus button. >> I love gardening. >> All right, pretty easy. There we go. You can see this is a very iterative process. To add another caption, you just click Add caption right down here and then add the next line, the process of actually typing this in is, I think where captions become really tedious and sort of painful. And thankfully there are a few automated tools to be able to help you, and I wanted to show you A few of those. One of those, is a third party service something like Rev, or Scribie or something like transcriptive from Digital Anarchy. All of these cost money, so in the case of Transcriptive, this is a plugin which you can see that lives inside the Premier which it will do the transcriptions and it will follow along with the video, you pay for the plugin and then you pay for the transcription. So it's a one time fee for the plugin and then every time you want something transcribed, there is a fee that is either per word or per time. I believe that's something you can look into. And then something like Rev is a transcription service that's done with humans, and so that tends to cost a little bit more long term, but the accuracy is close to 100%. If you're doing a lot of transcription, those are options that you may want to look into. I have found a little bit of a workaround, and there's a couple of different ways to do this, but you can get something as simple as a Google Doc to transcribe for you if you have a microphone connected to your system. Let me show you how that works. So I'm just gonna pin it premier over here. And I'm going to roll this back a little bit. And in the Google Doc underneath tools, there's an option for voice typing, which I already have enabled. If I start to play my sequence here and then I click this microphone button, check out what'll happen. >> And it's a way for me to watch things grow. It's also a way for me hopefully to eat a couple of things in the summer time. And this year I decided to really kick up my gardening level a notch. >> Okay. The only downside to this is as soon as you click outside the tab, it stops the microphone. And so you kinda have to leave this tab active for however long you're gonna do this kinda automated transcription thing. And it doesn't do any punctuation. However, you can take advantage of Grammarly if you have that installed and the built in spellcheck, which is also really handy. Another option that I found and I've actually used this more than this Google Doc method Is using a Google app. And this is only for Android phones, but there's probably something out there for iOS as well. Google tends to be a real powerhouse in the world of transcription. And they have a few apps that you can use to do this sort of automated. Transcription for free. One of those is live transcribe. This works on older devices. So the phone that I use is about 4 years old. And that works just fine with this and the really cool thing about live transcribe, Is it does punctuation and it'll go back and fix punctuation, like 30 seconds back in the past so you'll see it go down and be transcribing and it'll sort of guess on the fly at what the punctuation is. But then As it discovers that it has a 85 word run on sentence, it'll go back and add the punctuation and it is incredibly accurate. Every once in a while, it has a little bit of a hiccup. And you have to use a device to do this. So basically what I do is I launch the app, I play the audio that I wanna have transcribed and I've had this run for a couple of minutes without Any sort of problem. I stop my audio, I copy the text from this live transcribe app, and then I switch apps on my phone over to this Google Doc that I already have open, and then I paste the text in here. Let me show you the difference between this Google Doc method In this live transcribe method, I ran that same section and a little bit further so I could pick up some of the punctuation. It took only about maybe 15-30 seconds longer than doing it in this Google Doc. But check this out. Now I have all of the punctuation here and it's not All perfect, you can see that we have a little issue here where that should be the same sentence there, but it's really pretty good. And I'm going to go with this to finish adding a few captions here to my project. So let's talk about how to export your projects with captions. I'm gonna disable my proxies. I'll make sure that my sequence is selected. I'll hit Ctrl+M. I'll pick my preset. So let's say I'm going to say we're going to Facebook. Right? over here in the captions tab, we have the option to Burn in our captions, and so it's not gonna burn in for the entire time here. But if we shorten this up, To something like this, we'll give this a quick render and you can see exactly how this is going to look. When you upload it to Facebook. So I'm going to set an output here and then cue that in Media Encoder. I'm gonna get that started and then I'm going to export this again. And I'm gonna use about the same in and the out point, which is fine, but this time,I'm gonna scroll back here so you can see the caption, I'm going to select. Underneath export options, create a sidecar file. And when I do, you're going to see the captions, which looked like they were going to be burned in disappear. And so what this is going to do is it's going to export the captions as a separate file. That's what a sidecar file is something that leaves along the main file. And you have a few different options. Here you can use the STL format, and you have a bunch of different options down here. Probably the one that I have seen used most often is SRT I believe that's what YouTube uses. And so I'm going to just export it with the same settings that I had before. I'm gonna cue this in Media Encoder. And let's take a look at both of those when that's finished exporting. All right, here's what we have. We have the video with the burned in captions. Let's check that out. >> Let me tell you a little story about disappointment from my life. I love gardening And it's a way for me to watch things grow. It's also a way for me hopefully to eat a couple things in the summertime. >> That looks exactly like you expect it. The captions are burned in. Let's check out this second file here. >> Let me tell you a little story about disappointment from my life. I love gardening. Now you can see the captions look different. And that's because they are being displayed by VLC. So the captions are right down here in this SRT file. And in fact, this is really simple. It's just a simple text document with a SRT File extension. And there's timecode up here. It's kind of the beginning and end timecode for each one of these caption blocks, if you will, and then the number of the caption. And that's really pretty much it. I mean, you could almost make your own captions manually in this text file here. And so you can use that to upload to YouTube. And I like using the open captions because it gives you the option to create nice kind of stylized, burned in captions like this and export your file as a sidecar. Well that about wraps it up for this lesson and in fact wraps it up for this course. I hope you found this course useful and I hope that you learned a few things to make your editing experience easier, faster, and more enjoyable. Thanks so much for watching. Again, my name is Dave Bodi for Envato. And I'll see you around. [MUSIC]


