
 Lessons: 43Length: 6.5 hours
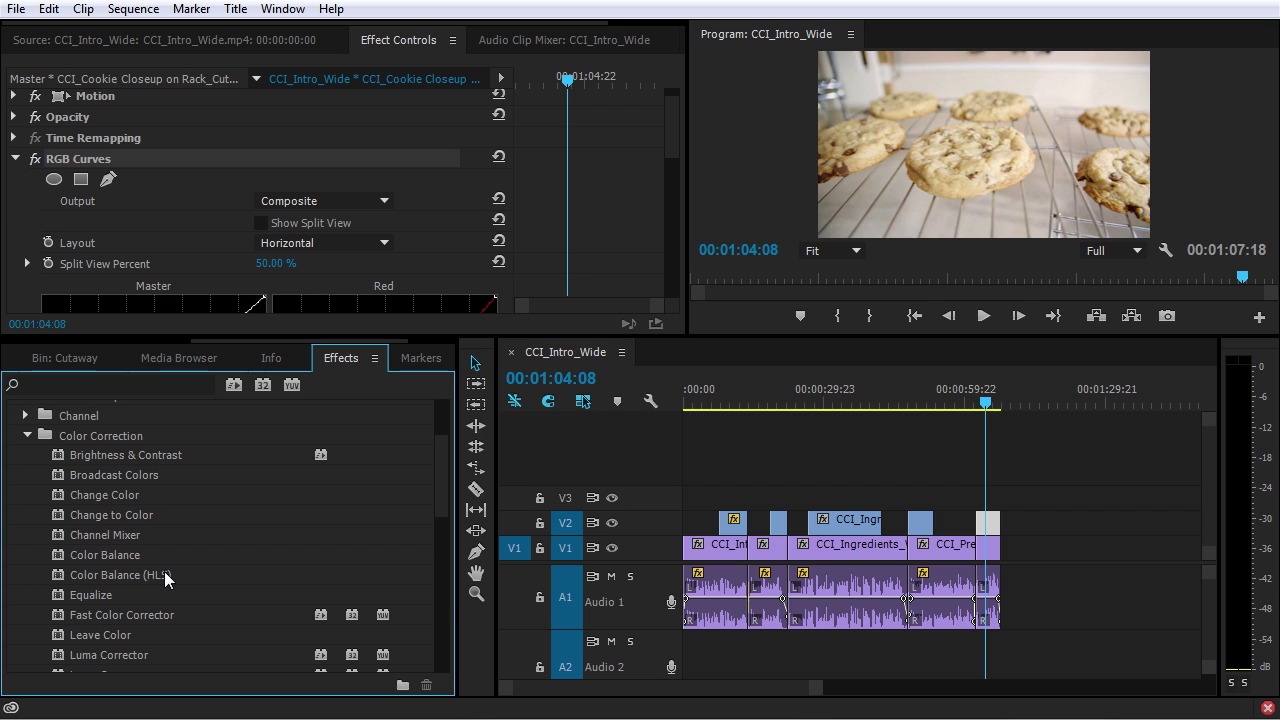
- Overview
- Transcript
6.1 Video Effects
In this lesson you will get a brief overview of the video effects offered in Premiere Pro.
1.Introduction
1.1Introduction01:12
1.2What You Need07:14
2.Getting Started
2.1File Structure06:07
2.2Quick Tour of Premiere Pro11:14
3.Set Up Your Project
3.1Import09:55
3.2Organize08:39
4.Editing Basics
4.1Creating a Sequence10:07
4.2Cuts06:26
4.3Subclips06:46
4.4Editing in the Timeline, Part One11:27
4.5Editing in the Timeline, Part Two07:19
5.Beyond Basic Editing
5.1Adding a Cutaway Shot10:06
5.2Building on the Basic Edit, Part 107:09
5.3Building on the Basic Edit, Part 209:09
5.4Audio Transitions11:22
6.Fine-Tuning the Look and Sound
6.1Video Effects10:48
6.2Master Clip Effects10:47
6.3Adjusting the Volume of Your Tracks09:46
6.4Audio Effects11:17
6.5Adding Titles11:16
6.6Exporting12:10
7.Conclusion
7.1Conclusion02:33
8.Frequently Asked Questions
8.1FAQ Introduction01:22
9.Sharing
9.1Dynamic Link to After Effects12:44
9.2Exporting to HEVC for Faster Sharing Online06:39
9.3How to Export ProRes Video and Other Professional Formats07:17
10.New Audio Workflows
10.1Using the Essential Sound Panel for Dialogue: Part 111:58
10.2Using the Essential Sound Panel for Dialogue: Part 206:35
10.3Using the Essential Sound Panel for SFX and Ambience07:59
10.4Using the Essential Sound Panel for Music08:35
10.5Send Audio to Audition for Editing From Premiere Pro13:59
10.6Mixing Audio With Killer Effects Inside Premiere12:57
11.Essential Graphics Panel
11.1Use the Essential Graphics Panel to Create Basic Titles12:30
11.2Use the Essential Graphics Panel to Create a Motion Graphic Title in Premiere13:23
11.3Make Your Own Templates for the Essential Graphics Panel03:51
11.4How To Use Title Templates in the Essential Graphics Panel: Part 107:14
11.5How To Use Title Templates in the Essential Graphics Panel: Part 207:09
11.6How To Use Transition Templates in the Essential Graphics Panel08:26
12.Real-World Projects
12.1Use Proxies for Faster Editing13:42
12.2Create Multiple Camera Shots From a Single Camera10:56
13.New Features
13.1Using the Freeform View09:36
13.2Use Auto-Reframe to Crop Your Video09:36
13.3How to Work With Captions13:41
6.1 Video Effects
In this lesson, you will get a brief overview of the video effects offered in Premiere Pro. So let's jump over to the Effects panel here and take a look at what Premiere has for video effects. You can see there are a bunch of effect bins here, and each one contains a bunch of effects. There are so many effects in fact that it would be impossible to even attempt to cover them in one lesson, or even 30 lessons, because there's so much you can do with the built-in effects inside of Premiere. However, I did wanna highlight a few effects that I think you'll be turning to quite often. A lot of times when you're working with footage, you're going to want to make some basic image adjustments, so I'm gonna jump to the end of the sequence here. And this last shot that I have of these cookies on these racks is one of the shots that ticks out quite a bit. Compared to the other cutaway shots, this clip right here looks a little bit over lit, and it looks like it could us a little bump in contrast and maybe a little bit of color tweaking. Now just like everything else in Premiere, there's several different ways that I can go about making some color and contrast adjustments to this clip. But let me show you a couple of simple ones. I'm just gonna search for an effect here called Fast Color Corrector, and I'm gonna drop this right on this clip here. I'm gonna expand the Effects controls panel here so we have a little bit more room to work with. Now, Fast Color Corrector has a bunch of options, I'll just show you a couple of the quick ones. You see there's a big color wheel here, I can use this to make subtle or drastic color changes to this clip. If I thought this looked too orange, I could pull this over towards blue, if I thought this looked too green, I could maybe pull this over towards magenta. And I have a pretty big range in terms of how much or how little I'm affecting the color of this clip. I'm just gonna reset that right up here. Down here I have some more basic adjustments, I have Saturation. So maybe I wanna boost the saturation just a little bit. That looks like it's a little bit too much, maybe like 120. And when I do, it actually looks a little bit too red. So I may pull this just a hair down to blue, just ever so slightly. I can use this section right here to adjust the contrast, I might wanna pull the shadows down a little bit. Maybe take this midtone and drop that by just a little bit, and then pump up the whites, maybe just a tiny bit. And if I toggle this on and off, You can see it does have a pretty big difference. So this is just one way that I could make this change, I'm gonna select that, and delete it. I can also use something like three-way color corrector, which is a heck of a lot more complex. Three-way color corrector gives you color wheels for the shadows, the midtones, and the highlights. And then if you click Master, you get a master color wheel, just like you find in the fast color corrector. So I could take this and I might do something like pull the shadows down to blue. Maybe pull the midtones down to blue and then take the highlights and maybe push those to orange a little bit. I might do the same thing with the black level and the white level, maybe just kick down this middle slider here, just a hair. And just make a few more adjustments in here, Until I thought it looked, Right. And you can see I'm getting a nice punchy look here as well. I could also use something like curves, which is another effect that I use quite often, and I could use this to give it a little bit of contrast here. Let me punch these down, pull down the shadows a little bit, maybe take the red channel and pull down the mid to just a hair. Maybe increase the blue in the mids just a little bit. And you can see I can get a very similar effect with this RGB curves effect here. So a lot of different ways to do the same thing. But the general idea is, when you wanna make a change to one of your clips, you find the right effect, and you may have to try one or two before you find exactly the right one you're looking for. You apply it to your clip and then you make some adjustments to the effect until you're getting the desired result. Now that may be blurring your footage, it maybe sharpening your footage, and maybe adjusting the brightness or the contrast or the saturation. It could be a number of things, but that's the general idea. And it'll probably take a little bit of experimentation until you figure out what tools you like to work with. Sometimes I like to work with curves, sometimes I like to work with the three-way color corrector, sometimes I can just use the fast color corrector. And if I clear the search bar here and I look under color correction, you'll see that there are even more effects that I can use to make those kind of adjustments to this clip. Now, let me jump over here, let's say you like the look of your footage but maybe you wanna give it something like a little bit of a vignette. Well, you can do that, and a really easy way to do that is with a curves adjustment. I'm gonna throw an RGB curves on here. And the cool thing about the most recent few versions of Premiere is that all of the standard effects now come with a masking option. So what I could do to create a vignette here is I could just pull this down in the middle here and then create an elliptical mask. And then I'll just adjust the mask here. Let me add just a few more points, To do this kind of thing. And then I can invert this. Maybe add some feathering, Push the mask expansion out a little bit. Maybe pull this down a little bit darker, And check that out. Now I have a nice vignette here on my footage, but that's only to this one clip. As soon as I go to the next clip, I lose my vignette. So what if I wanted to create a vignette for all of these clips? Well, that's really easy to do. I can come over here to the Project panel, I'll go to New> Adjustment Layer. I'll leave it at the default settings because those match my sequence settings. And I'll pull an adjustment layer out here. And I'll make it the size of my sequence. And then I can actually just take this effect here that I put on this clip. And I'll grab it right here, and I will cut it, Ctrl + X, And I'll paste it on this adjustment layer. And it's gonna look exactly the same, but now this adjustment layer is affecting all of the clips below here. So now I have a vignette here and here, and basically everywhere. So I can use an adjustment layer to apply effects to it, and that'll apply the effects to all the tracks below the adjustment layer. If I pull up a track above here, you can see no vignette. But when I put it back down where it was before, now I get the nice looking vignette. So very, very flexible. I can add effects to individual clips or I can add effects to an adjustment layer and have it affect multiple clips over a long period of time. I'm gonna delete this here. Now there are many other video effects, and that's going to take some experimentation on your part. There's also several Video Transitions, if you look right under here, and in my opinion, most of these are a little hokey. The only one that I use consistently is this cross dissolve right here. And cross dissolve does pretty much exactly what you think it would do. I'm gonna toggle off the eye for the second video track here. And I'm gonna drop a cross dissolve in between these two clips right here, And watch what it does. >> Easy. Hi, my- >> Exactly what you thought, right? It's going to fade the opacity of this layer down while simultaneously fading the opacity of this layer up. And this is pretty much the only video transition that I use. It's also set to my default video transition. So, I just click down here and jump to another edit point. If I wanna add that video transition here, just like adding an audio transition, it's Ctrl+D on the keyboard. Now you see it added the video transition on this clip and this clip right here, which is not what I wanted. So instead, I'm gonna undo that, I'm just gonna select this edit right here and Ctrl+D. Now if I go to the beginning of my sequence by pressing the Home button, I can add a cross dissolve right here. And this will essentially fade up from black. >> Have you ever had a recipe- >> Which is what I wanted. I'm gonna delete these two transitions. And I think it might look nice to throw a cross dissolve right here. >> Not flat, not- >> And in order to see that, I'm gonna have to toggle on the track output. >> Crispy, not flat, not too dry, delicious flavor, picture perfect. >> And I get a nice little fade up right there. Now if I go all the way to the end of my sequence, I can't use a crossfade here to fade to black. Because if I put a crossfade on this cutaway shot, it's going to pull the opacity down and reveal this track below. And that's not what I want. So instead, what I will usually do is come over here, click on the New Item button and choose Black Video, and then pull black video in here, select this edit right here, and Ctrl+D. It'll come to just a few frames after, Ctrl+K to split it, and then delete the rest of it, and now I have a nice fade to black. >> I just get too dark. >> Super simple and very easy to do. Again, there are a ton of video effects and video transitions in Premiere, we only covered just a handful of them. Take some time and explore the effects, push some things around and find out what works and what doesn't work for you. In the next lesson, you're gonna learn about a fantastic feature in Adobe Premiere Pro called Master Clip Effects.


