
 Lessons: 43Length: 6.5 hours
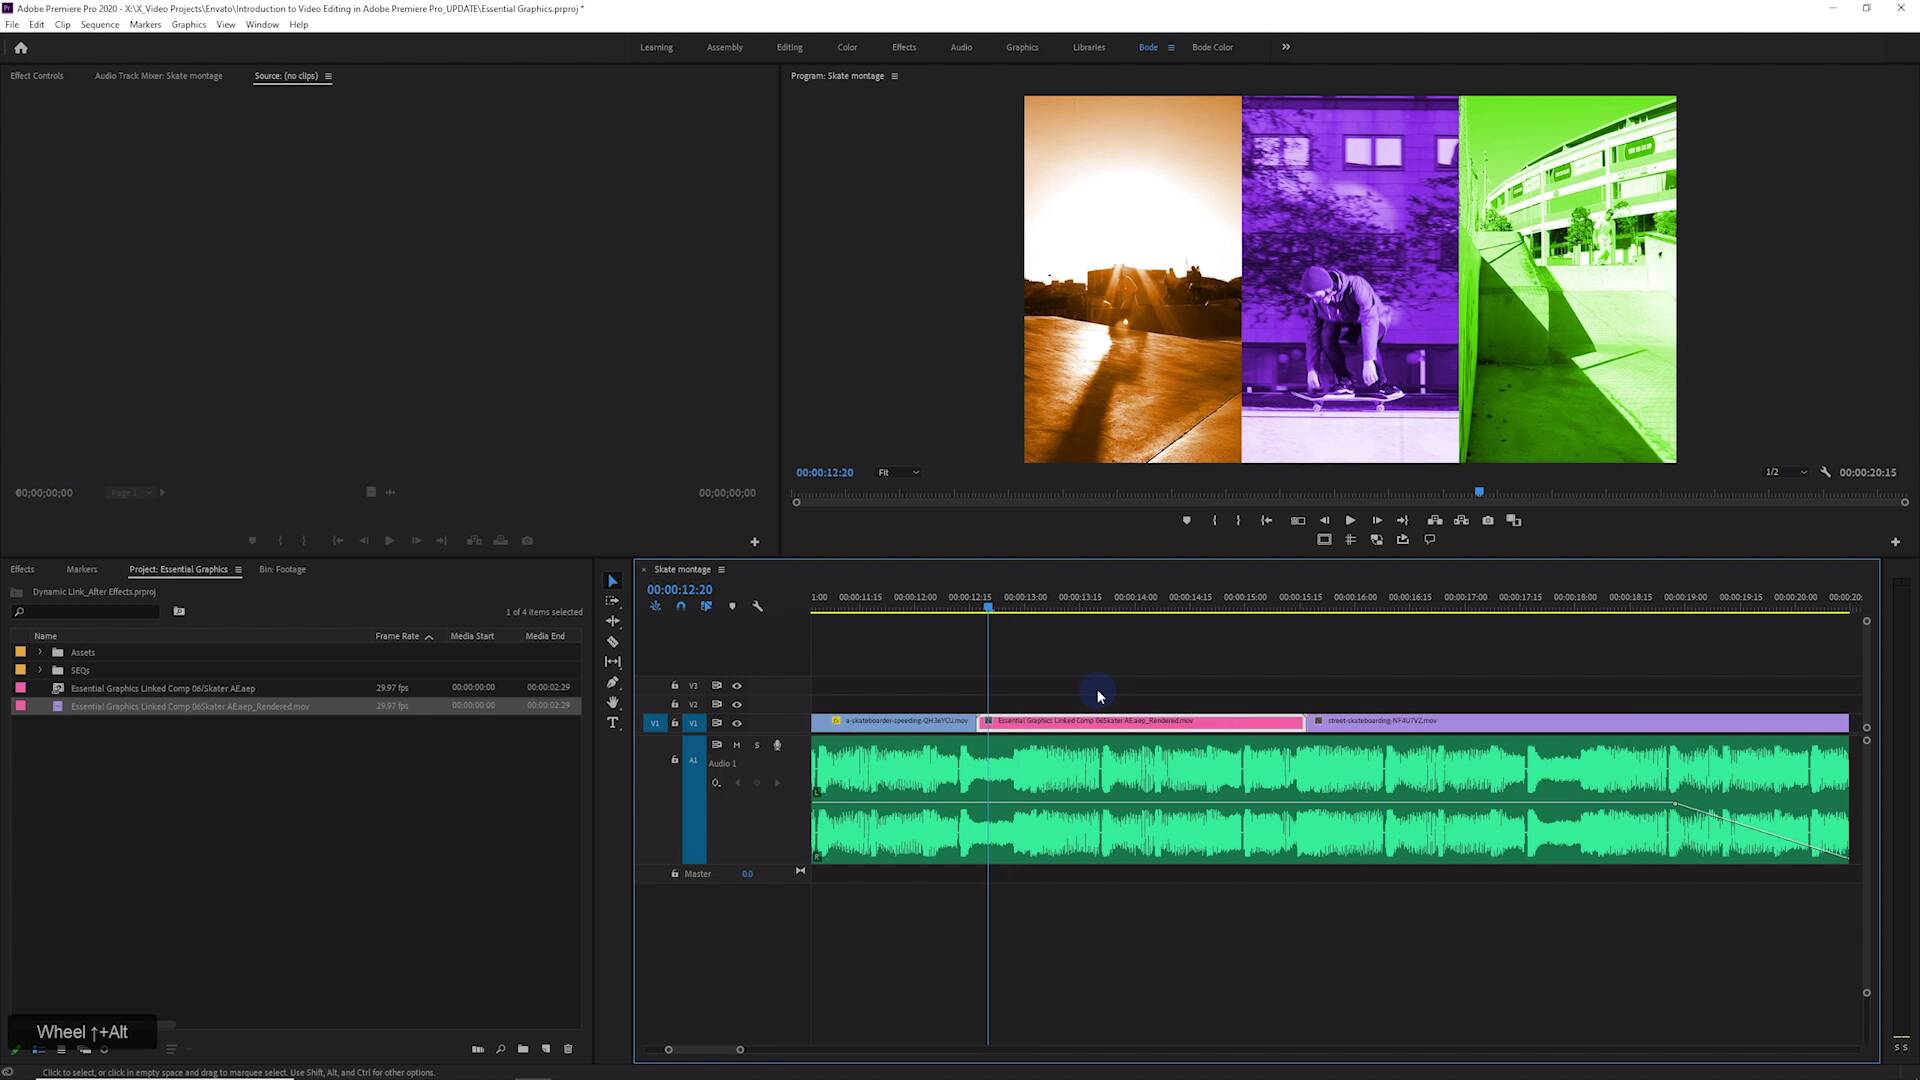
- Overview
- Transcript
9.1 Dynamic Link to After Effects
In this lesson, you are going to learn how to send a project to After Effects for additional graphics, animation, color correction, and grading!
Related Links
- Adobe After Effects Video Templates on Envato Elements
1.Introduction
1.1Introduction01:12
1.2What You Need07:14
2.Getting Started
2.1File Structure06:07
2.2Quick Tour of Premiere Pro11:14
3.Set Up Your Project
3.1Import09:55
3.2Organize08:39
4.Editing Basics
4.1Creating a Sequence10:07
4.2Cuts06:26
4.3Subclips06:46
4.4Editing in the Timeline, Part One11:27
4.5Editing in the Timeline, Part Two07:19
5.Beyond Basic Editing
5.1Adding a Cutaway Shot10:06
5.2Building on the Basic Edit, Part 107:09
5.3Building on the Basic Edit, Part 209:09
5.4Audio Transitions11:22
6.Fine-Tuning the Look and Sound
6.1Video Effects10:48
6.2Master Clip Effects10:47
6.3Adjusting the Volume of Your Tracks09:46
6.4Audio Effects11:17
6.5Adding Titles11:16
6.6Exporting12:10
7.Conclusion
7.1Conclusion02:33
8.Frequently Asked Questions
8.1FAQ Introduction01:22
9.Sharing
9.1Dynamic Link to After Effects12:44
9.2Exporting to HEVC for Faster Sharing Online06:39
9.3How to Export ProRes Video and Other Professional Formats07:17
10.New Audio Workflows
10.1Using the Essential Sound Panel for Dialogue: Part 111:58
10.2Using the Essential Sound Panel for Dialogue: Part 206:35
10.3Using the Essential Sound Panel for SFX and Ambience07:59
10.4Using the Essential Sound Panel for Music08:35
10.5Send Audio to Audition for Editing From Premiere Pro13:59
10.6Mixing Audio With Killer Effects Inside Premiere12:57
11.Essential Graphics Panel
11.1Use the Essential Graphics Panel to Create Basic Titles12:30
11.2Use the Essential Graphics Panel to Create a Motion Graphic Title in Premiere13:23
11.3Make Your Own Templates for the Essential Graphics Panel03:51
11.4How To Use Title Templates in the Essential Graphics Panel: Part 107:14
11.5How To Use Title Templates in the Essential Graphics Panel: Part 207:09
11.6How To Use Transition Templates in the Essential Graphics Panel08:26
12.Real-World Projects
12.1Use Proxies for Faster Editing13:42
12.2Create Multiple Camera Shots From a Single Camera10:56
13.New Features
13.1Using the Freeform View09:36
13.2Use Auto-Reframe to Crop Your Video09:36
13.3How to Work With Captions13:41
9.1 Dynamic Link to After Effects
[MUSIC] In this lesson you will learn how to use Adobe's dynamic link to get your project or even parts of your project over to After Effects for additional graphics, animation, color correction, and grading, and more. So I have a real basic project here in Premiere. I just threw together a little montage using stock clips of some skateboarders. And right here, I have a stack of three clips that I'd like to do kinda three panel. I have three skateboarders, each one is doing a trick and I'd like to do kind of a three up or three panels shot of this. And for sure this can be done in Premiere, but it would be a lot faster to do in After Effects. And there's some things that well, you can't do in Premiere because you don't have the same kind of plugin set. So I'm gonna show you how to use dynamic link to get these three clips over to After Effects, and then have Premiere basically live update any changes that I make in After Effects. And this is super simple. You can just right-click on these three clips or even a single clip, and then choose Replace With After Effects Composition. All right, so After Effects loaded right up here, and the first thing that it does is to ask us to save the project, which you definitely should. And you should also probably save the project in the same location as your Premiere project, maybe even in the same kind of folder structure doesn't have to live right next to your Premiere project. I'm just gonna replace this After Effects file right here, Skater AE.aep. I'll just replace that, no big deal. And After Effects will import those clips automatically and it will put those clips inside a composition that's the same length as my original clip. If I go back to Premiere, you can see that now those three clips are gone, and what I have in its place is this dynamic linked media item right here. So over in After Effects, I'm gonna do something just really, really quick. I'm gonna create a new shape layer, and you don't have to follow along exactly. I'm gonna delete that stroke. I'm gonna change the shape of this. Just divide that by three, I'm gonna hit enter, and name this Center Matte. I'm gonna duplicate this. Name that Right Matte. I'll duplicate that, Name that Left Matte, and I'll bring up the alignment window because it's not already up here. There it is, dock that right over here. I'm gonna take the left one, and align it to the left side. I'll take the right one, align it to the right side. I'm gonna use these three layers as track mattes. So I'm gonna drag them down above my footage layers, and then select all of my footage layers, and set them to Alpha Matte. Now I'm gonna take my matte layers and lock them, so that I can't move them around. And then I'm just going to reposition my layers in the background so that they are centered up in each one of these frames. I'm not sure which one goes where. Okay, we got that guy over there, and then this skater over here. Really, really quick, really, really easy. I'll just save this, and if I jump back to Premiere, check that out. [MUSIC] Pretty easy, right? If we go back to After Effects, I'll use video co pilots Fx console, and I'll pull up the try tone effect, which is a stock After Effects effect, maybe make this one orange. I'll just copy that effect, paste it down here. Maybe make this one kind of, I don't know, green maybe, that looks cool. And the center one, maybe make this purple. Pretty cool. [MUSIC] Really, really simple, really fast to do. Now, depending on what you are doing in After Effects, you can see that this media item here, this clip is showing up red on the timeline. That means that there are not cached frames, and it might not play back in real time. My system is pretty fast, so I have a pretty high level of confidence that this sort of thing will play back in real time and not dropping any frames. But your mileage may vary. And you may be on maybe a mobile system or maybe a system that's a couple of years old. And so dynamic linking in After Effects will work, but you may find that the effects that you're using inside of After Effects are going to not play even close to real time. So there's a way that you can kind of get around that pretty easily. You can just take your clip here, and then choose Render and Replace. It's gonna pull up a Render and Replace window, and it'll come up with some options here. I'm gonna leave this on Individual Clips format of QuickTime, although you have some other options there. And I'm just gonna use GoPro CineForm, and that'll be fine. Underneath Destination, you can choose Next to Original Media, or you can browse. And I'm going to store this in my Assets folder under a sub-folder called AE Renders. You can put it wherever you'd like. It's also going to render 30 frames as handles before and after the clip, although I don't think that's gonna work quite right because there's the way that the clips were trimmed. It doesn't matter though cuz this is gonna work fine. I'll hit OK. And this is going to basically render that out and replace it in the timeline. There you go, it's done. And now you can see that portion of the timeline has turned yellow [MUSIC] It'll basically play nice and smooth like any other clip because we have transcoded this into a nice intermediate codec. I did GoPro CineForm 10-bit but you could also choose ProRes. Either one, it really makes no difference. If you're doing something that has some kind of alpha channel, you'll probably wanna pick one of those codecs that is labeled as having an alpha channel. So the only caveat here is that now, when you over to After Effects, any changes that you might make, maybe we want this to be blue. Save that. We'll jump back here. These will not update anymore. However, once you've made changes, you can just replace this clip right here. So you can right-click on this and choose Replace Clip With. And you wanna make sure that you have your After Effects clip right here, the one that ends in aep in the timeline. You wanna make sure you have that selected. Then you can come up here to Replace Clip from Bin, and that will replace it with this After Effects media item right here. [MUSIC] No big deal. So either way, you can just leave the After Effects media item in here or the dynamic link clip in here. Or you can render and replace if things are going a little bit slow. But just know that once you've rendered and replaced, it's like you've rendered it from After Effects. So the updates or any more updates that you will make are not going to update. And you'll have to replace it and then re-render it to get those. Now a couple other things that you want to keep in mind. You can also create a dynamically linked After Effects project without sending anything over to After Effects. So if you just come up here to File, and then go down to Adobe Dynamic Link, you can do a new After Effects composition. If you have a clip selected, this option right here that is currently grayed out, will be available, which is what we did before. You can also import an After Effects composition from another project, which is pretty cool as well. Maybe you've already been working on some kind of motion graphic intro. You wanna put it In your project and still have the option to be able to adjust it on the fly, that's an option for you. But let's say we wanna create another After Effects composition. And we'll just leave these at the default settings which match our timeline here. And it'll create another comp in After Effects. Now the one kind of maybe unfortunate thing is that these comp names are not ideal. And if you're sending a lot of stuff over to After Effects to do a whole bunch of different dynamically linked compositions. These comp names, if you rename them, so let me rename this Essential Graphics Linked Comp 07 which is just completely meaningless, to Text Thing. Because I wanna do some kind of text treatment to this. It's also probably a good idea to just, Maybe do a little bit of organization in After Effects just like you would, In Premiere just to keep yourself sane. The problem with naming comps in After Effects, even if we save this, we jump back to Premiere. Those names don't update at all. So you may want to just replace the first part of this media item right here with the same name as your composition, so that you can just keep those things straight. So now if I just bring this item right out on the timeline here, of course it's not gonna do anything cuz there's nothing in my After Effects comp. But if I jump back over to After Effects, and we come over to the Text Thing Comp, let's just throw some text in here. Here we go, some text goes here that is obviously my favorite font. I'll just center that up there. And if we jump back to Premiere, you can see that updates here. And that's a really simple thing. I wouldn't throw things over to After Effects just to put text in there, because you can do that with the essential graphics panel a lot easier. But you could get in here and do all kinds of cool animation to this text. You can use all kinds of effects that are not available in Adobe Premiere. And you can have that live updates over in Premiere. The cool thing about using text for this kind of dynamic linked workflow, is if you have your clip selected here, and you go over to the Effects Controls, and you jump over to the Master Tab. Check this out. Whoa, the text will update from Premiere, And this gives you a lot of flexibility so you can design a really simple text thing. And this is really similar to how the essential graphics now works with the mogar templates or motion graphic templates. Where you can basically just update the text, and The Thing that was built in After Effects will update automatically. And this works even if you have multiple text layers, so I just duplicated that with ctrl + D. More text, check this out, write over an After Effects, woah, It updates, which is really really cool. Now of course this is a really simple example and you can use the same idea to use all the great things in After Effects. Maybe you wanted to do some more advanced color grading than you can do with the Lumetri color panel. Maybe you want to do some motion tracking, and add some kind of cool, maybe 3Dish type effects here. All that is available, anything you can do and After Effects, you can do in this dynamically linked way. The cool thing is you don't even need After Effects to remain open for this to work. You can close After Effects, and you can see that this will play basically in the background because I'm pretty sure it's just running After Effects in the background. But you don't have to remember to open up After Effects because I just closed that down every time you open up your Premiere project. And anytime you wanna go back and make a change, you can just right-click here and choose Edit Original, and it'll fire After Effects right back up, and you can get to work on making your updates. Well that about wraps it up for this lesson. Make sure to check out the next lesson where you are going to learn how to export your projects using the successor to H.264, H.265, or high efficiency video codec. [MUSIC]


